This page walks you through every screen in the app and shows you what goes where, and why. From setting it up to the last button you’ll tap. Keep it open next to you while you set things up — or come back later and dip into a chapter when you need it.
Seven steps, about two minutes. Do this on the phone you’ll actually use the app on. The steps below show the iPhone route — Android and computers are covered at the end of Part 1. The order matters: put the icon on your home screen first, then sign in. Safari and a home-screen app store their sign-ins separately, so signing in from the icon is what makes it stick.
On your iPhone, open the link I sent you:
thrivezone-academy.de/en/app/
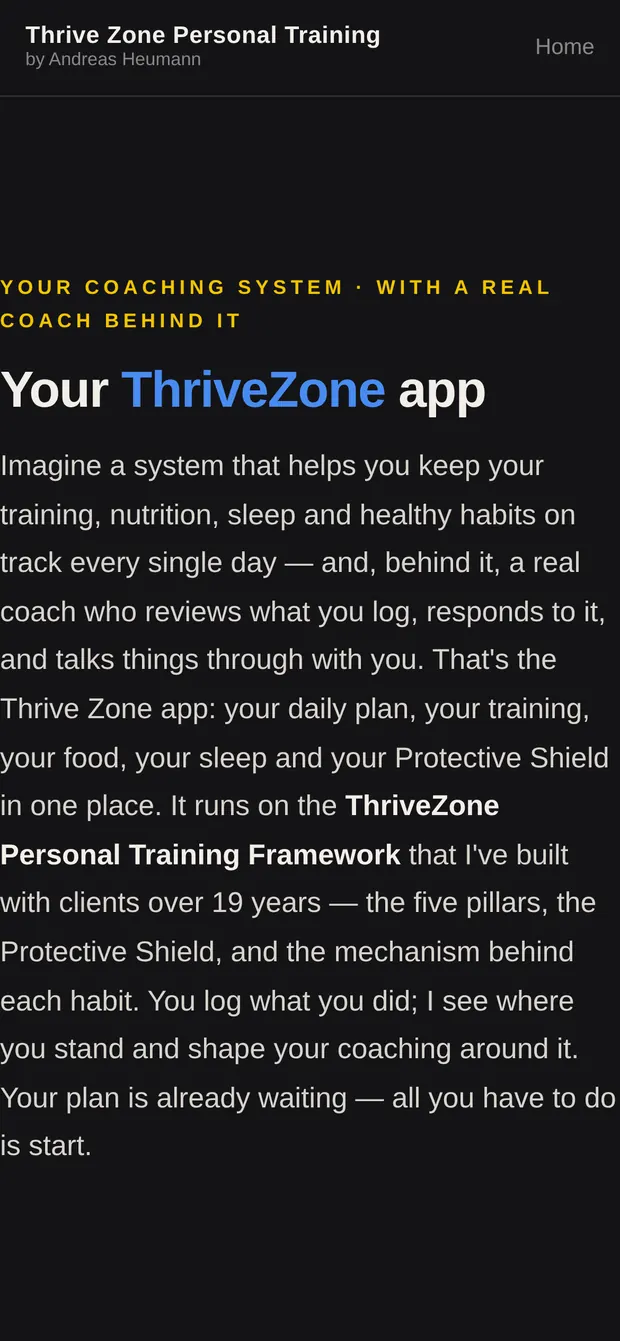
The page gives you the short version of what the app is and what happens to your data. Read it once before you go on.
Scroll to the bottom, to “Privacy & your consent”. It sums up what the app records and where that’s stored; tapping “Full privacy notice (app)” opens the whole thing.
Tick the box. Only then does the blue “Open the app →” button become tappable. The date and time of your consent appear underneath it.
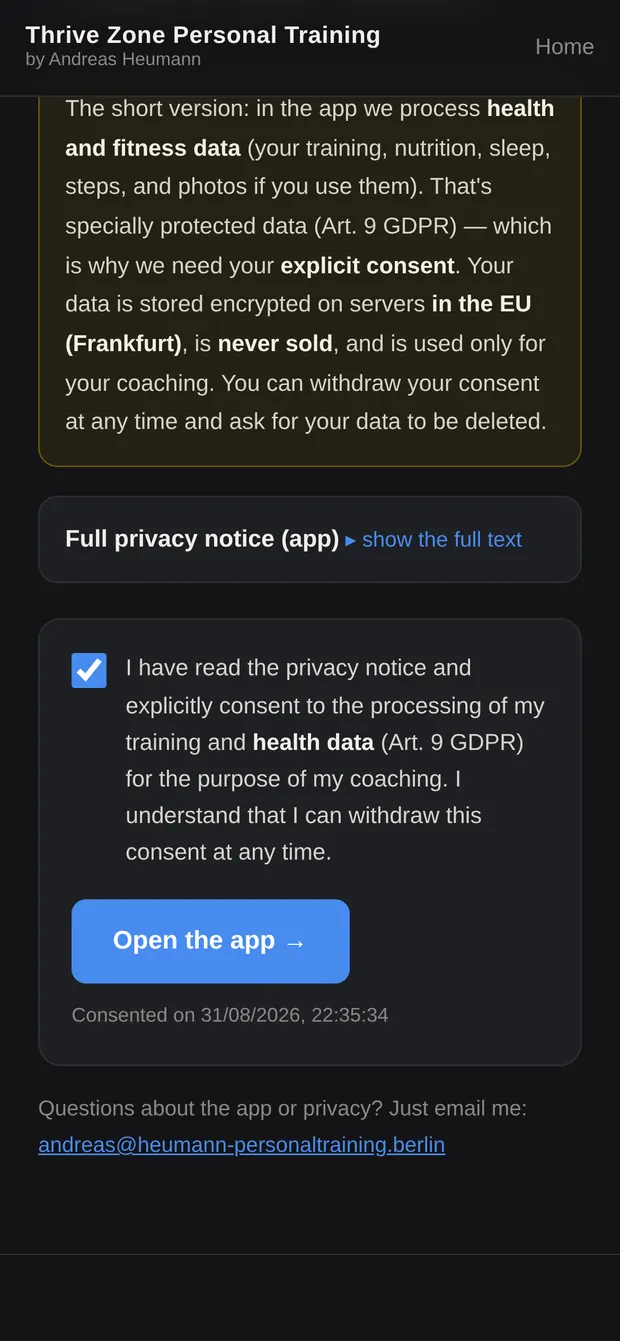
Tap “Open the app →”. It opens in whichever browser your iPhone uses by default — for most people that’s Safari. Don’t sign in yet — put it on your home screen first:
The ThriveZone icon now sits on your home screen like any other app.
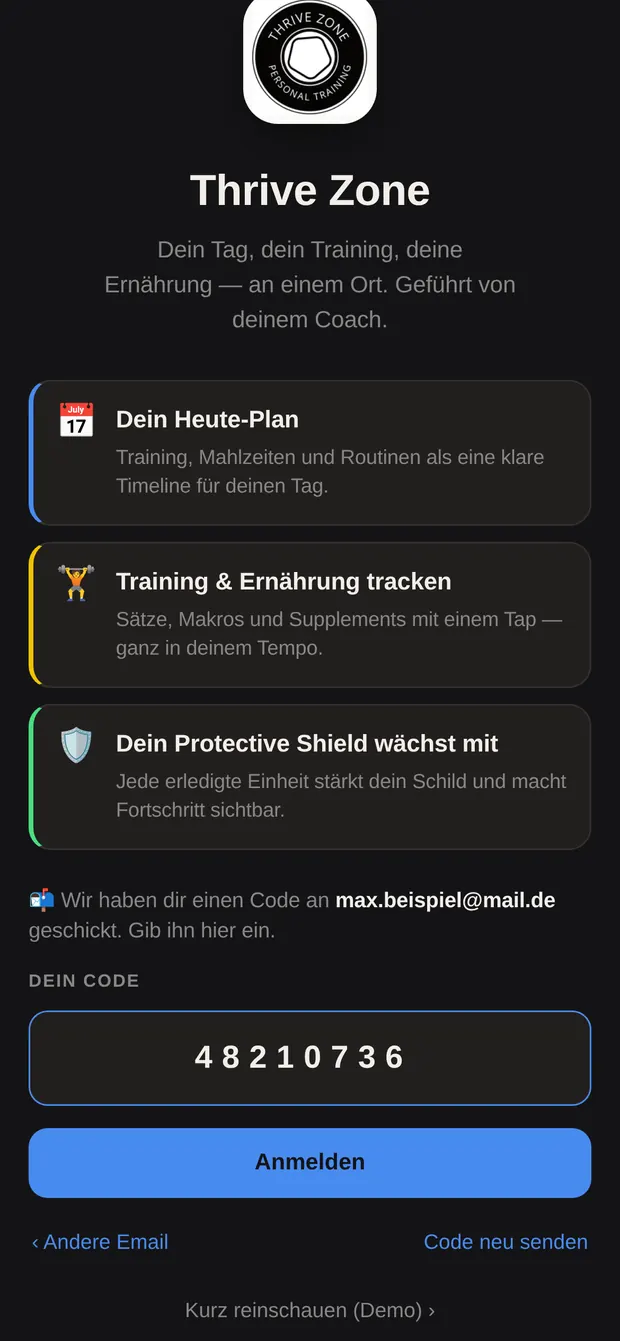
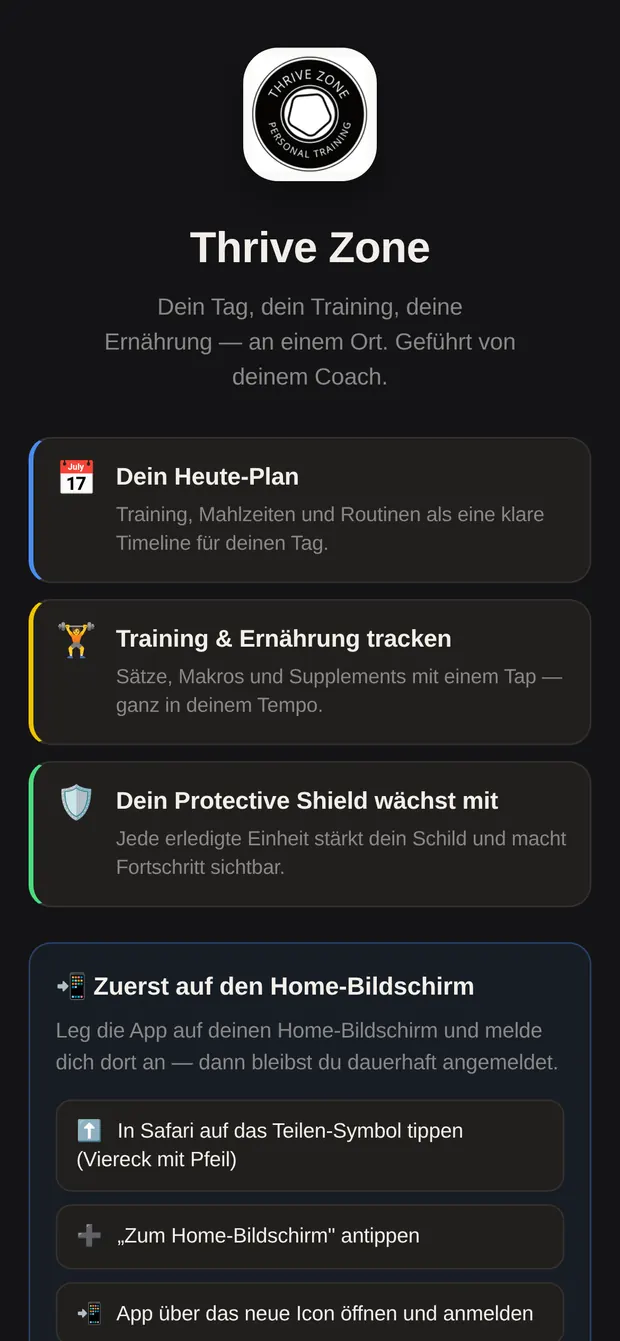
Close Safari and open the app from the icon on your home screen. You land on the welcome screen: the logo, and three short cards explaining what the app does.
If you open the app in Safari, you also get the note “Add to your home screen first” with the three steps above. Once you’re in through the icon, that note is gone and you go straight to the email field.
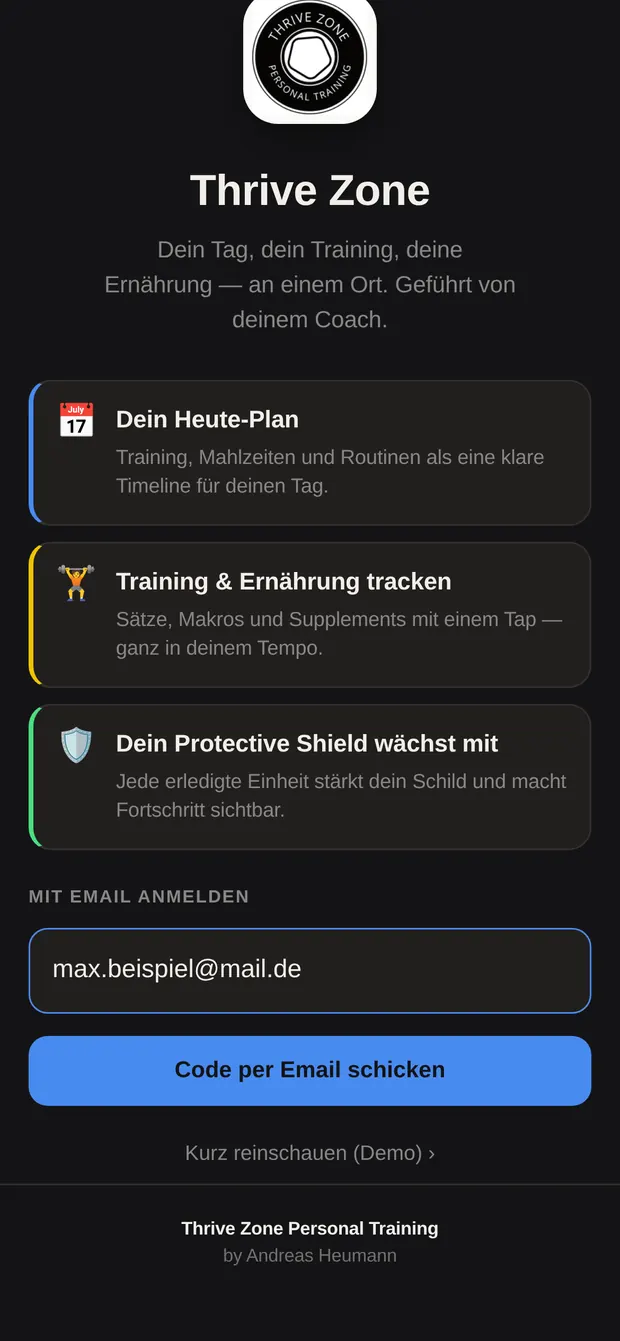
Under “Sign in with email”, type in the exact address I sent your invitation to. Your account is tied to that address — another one won’t work.
Then tap “Email me a code”.
You’ll get an email straight away from Thrive Zone Personal Training with an 8-digit code. Type it into “Your code” — the “Sign in” button goes live once all eight digits are in.
The code takes you straight into your day. Your daily structure, your plan and your targets are already there — I set them up before sending you the link.
You stay signed in. Next time, tap the icon and you’re in. You only need a new code if you sign out or switch devices.
From here on it’s about using it — on to Part 2
The app isn’t an App Store download — it’s a web app, so it runs on anything with a browser. Only the route onto your home screen looks different. Everything else in this guide is the same wherever you are: same screens, same buttons. The pictures here are from an iPhone.
Open the link in Chrome. Then Menu ⋮ at the top right and “Install app” — depending on the version it may say “Add to Home screen”. From there it’s the same as above: open the app from the new icon and sign in there.
Just open the link in your browser and sign in — nothing to install. If you’d rather have it in its own window, Chrome and Edge show an install icon at the right-hand end of the address bar.
Same as a phone: iPad exactly like iPhone, Android tablet like Android.
The app has one main page: your day. Everything else slides up from the bottom in its own window and slides away again. Here’s the home screen in order — follow along on your phone as you read.
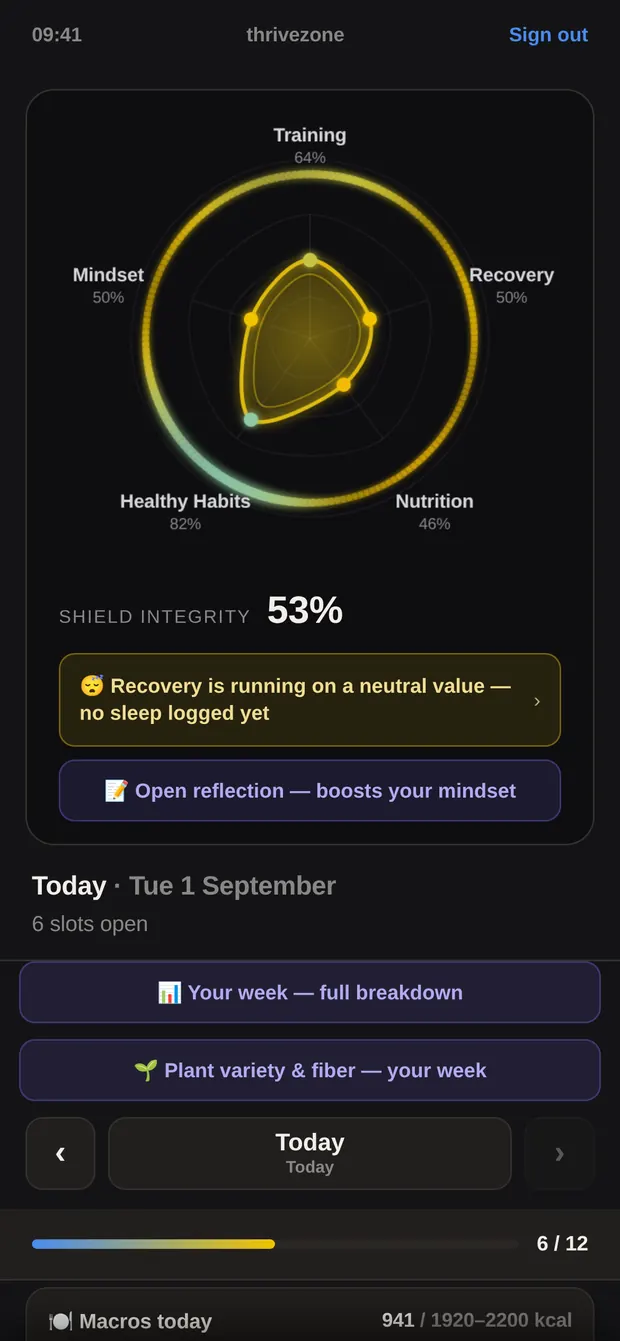
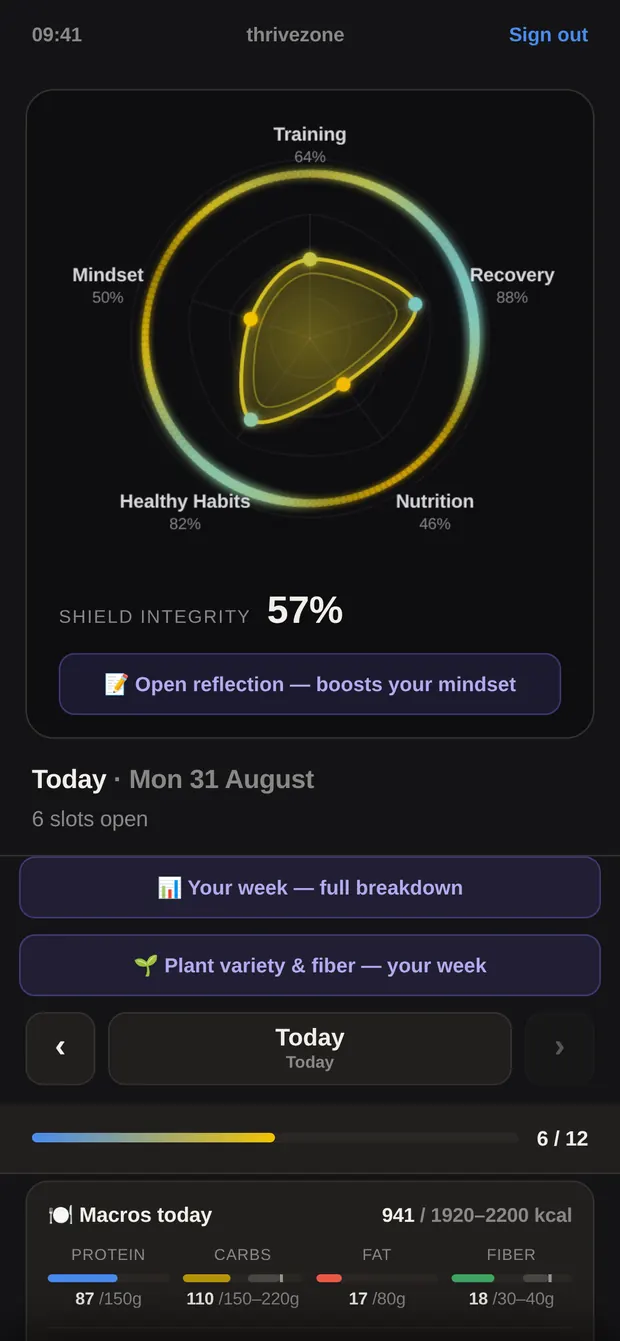
The five corners are your five pillars: Training, Recovery, Nutrition, Healthy Habits and Mindset. The further a corner reaches out, the stronger that pillar is today. Underneath, Shield integrity as a percentage — one number that pulls all five together.
It starts low in the morning and fills up as the day goes on and you tick things off. That’s by design. Part 13 explains how it’s worked out.
If there’s no sleep logged for today yet, a yellow line appears underneath: “😴 Recovery is running on a neutral value” — tap it and you go straight to the sleep window. Part 13 explains why that matters.
Right below it sits the purple button “📝 Open reflection — boosts your mindset”; once you’ve written something for today it reads “Edit reflection” — more on that in Part 11.
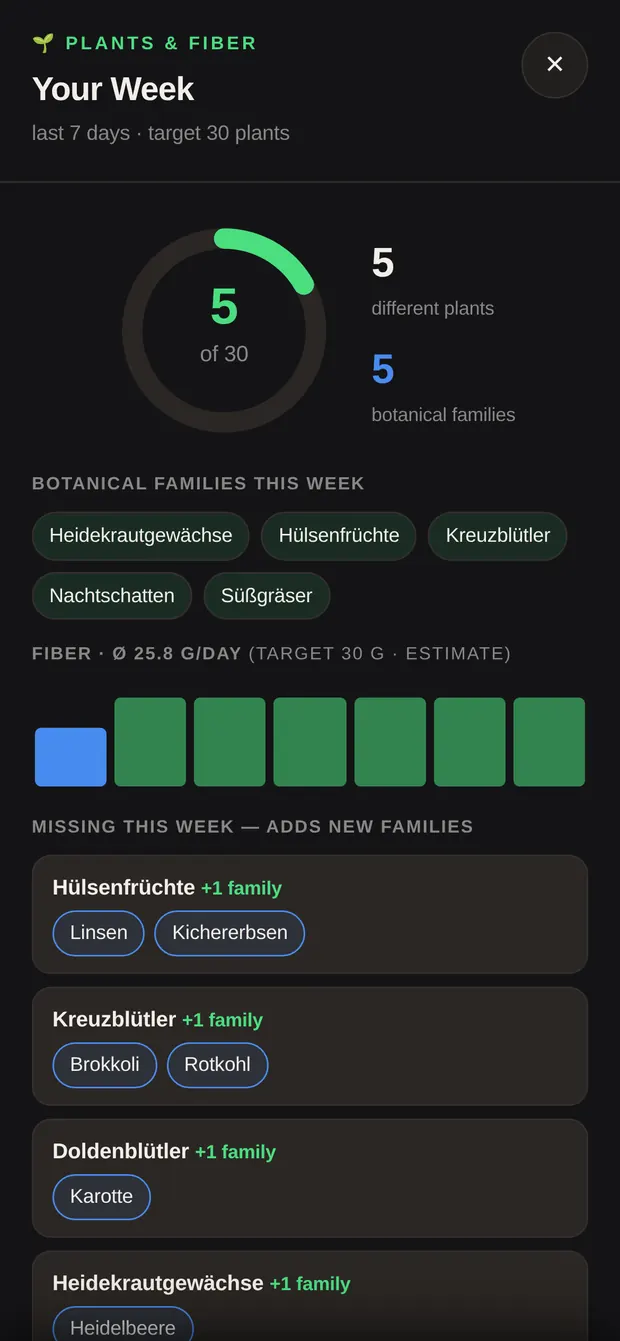
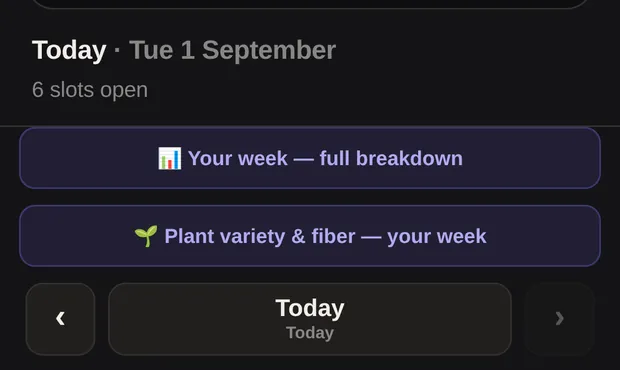
Below the shield: today’s date and how much is still open — the app calls the individual items in your day “slots”, e.g. “6 slots open”. Then two buttons that open your weekly reviews — “📊 Your week — full breakdown” and “🌱 Plant variety & fiber — your week” (Part 12).
The row with the arrows ‹ Today › is your day switcher. Tap the left arrow to go back a day — the date appears with “Catch up · tap for today” underneath. Anything you log while you’re back there lands on that day, not today.
The thin bar shows how much of your day is done, with the count next to it — 6 / 12, say.
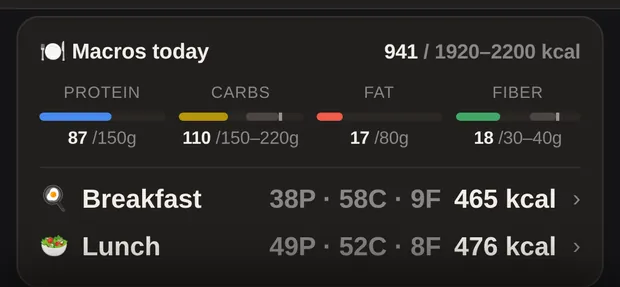
Then “🍽 Macros today”. Top right are your calories: what you’ve logged against your daily target. If it shows a range like 1920–2200 kcal, I’ve given you a carb range rather than a fixed number.
Below that, bars for protein, carbs, fat — and fiber, if I’ve set you a fiber target. Under each bar: where you are against the target.
Every meal you’ve logged today gets its own row with its numbers. These rows are tappable — one tap opens that meal to edit. Handy for a snack you added on the fly, since it hasn’t got a card of its own.
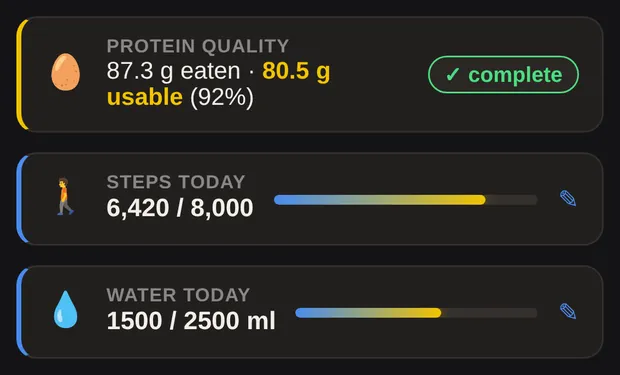
Three cards sit below the macros:
If a card still says “Log”, you haven’t entered anything for today.
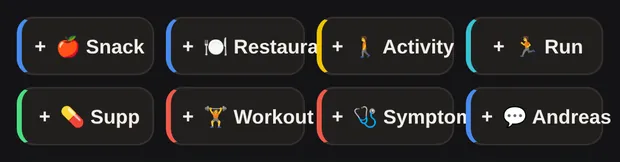
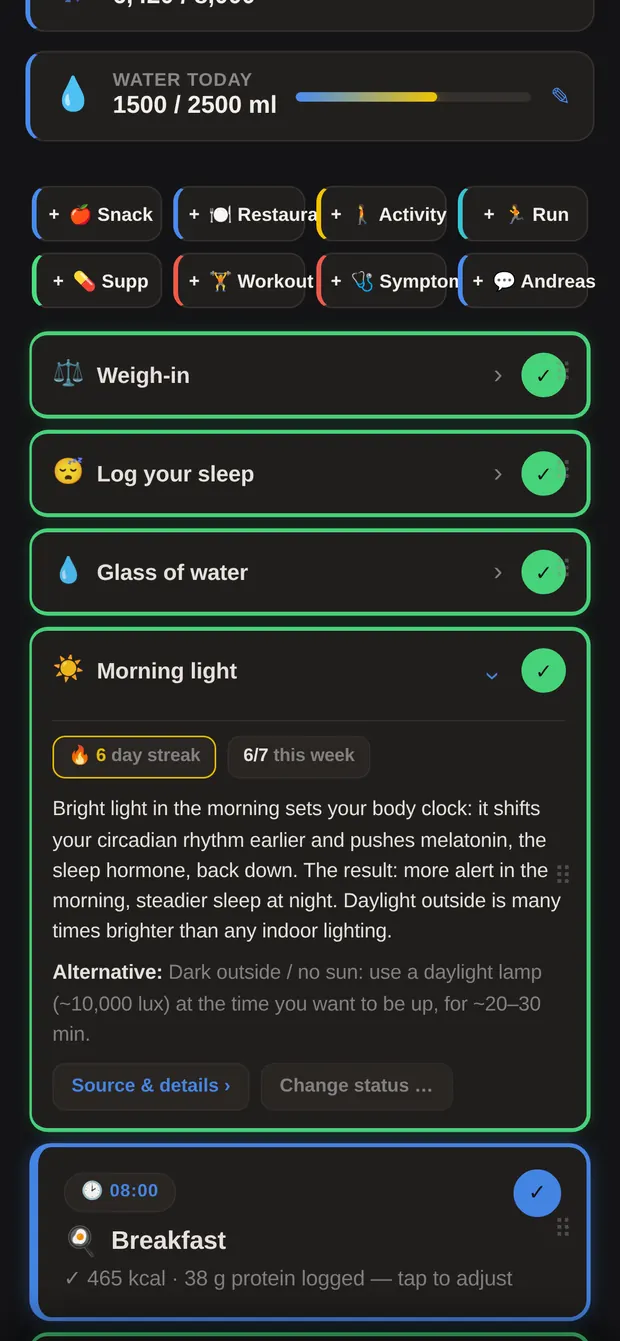
Eight small buttons for everything that comes up on the fly and has no fixed card in your day:
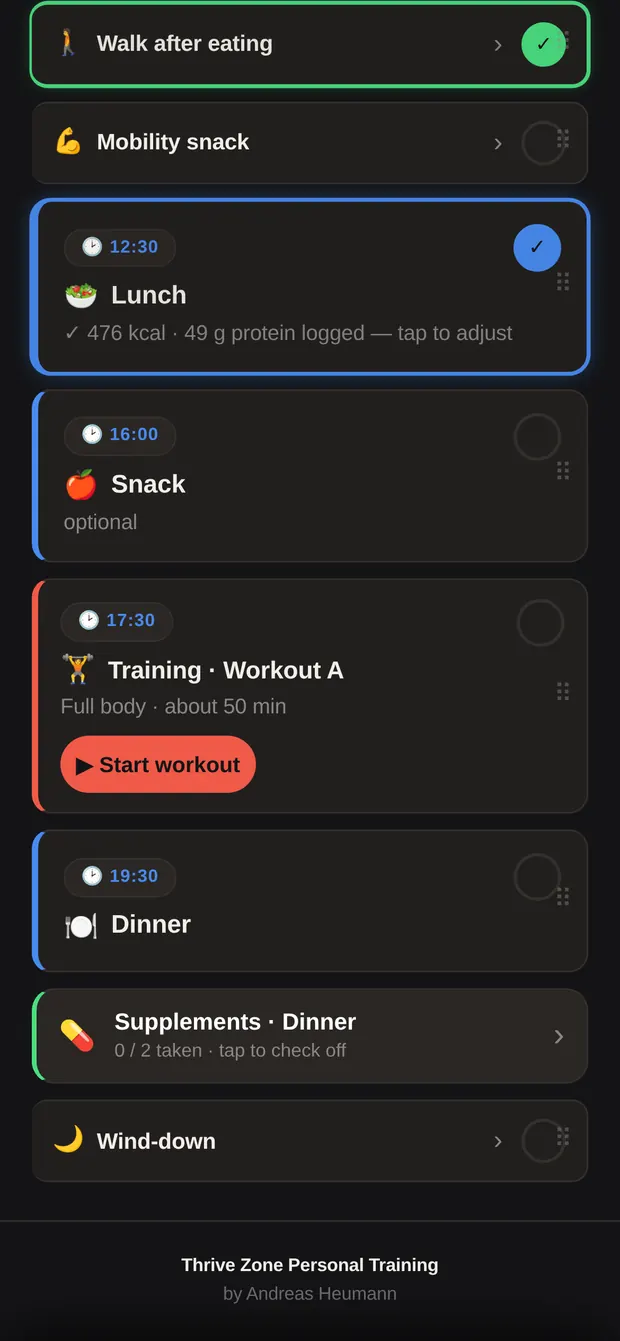
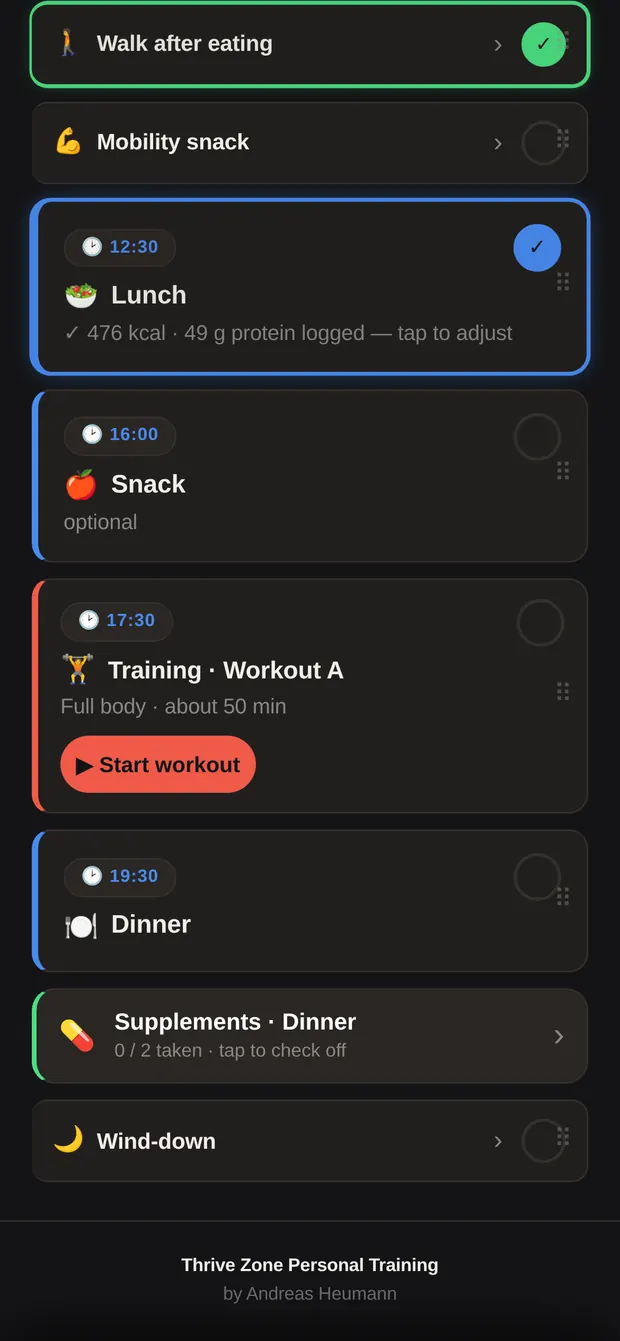
From here on it’s the day itself: everything that’s on for today, in order from morning to night. Big cards for meals and training, slim rows for everything else — habits, mobility, wind-down.
The Thrive Zone Personal Training block sits right at the bottom — that’s the end of the page. Your list shows exactly what’s on your plan today.
Your day list is built from two kinds of card — and the size tells you how much work is behind it. On top of those, the app slots in two cards of its own.
Water, morning light, the walk after eating, mobility, wind-down. These rows have two places to tap:
Two more cards turn up in among the rows. They aren’t part of your daily structure — the app adds them itself:
Some rows have a “🏖 off” button (the commute row, for instance) — tap it and the row is hidden for the day. “Hidden today:” then appears at the bottom of the list with a button to bring it back.
Blue for meals, red for training. Here’s how they work:
Once a meal is logged, the card says what’s in it: “✓ 465 kcal · 38 g protein logged — tap to adjust”.
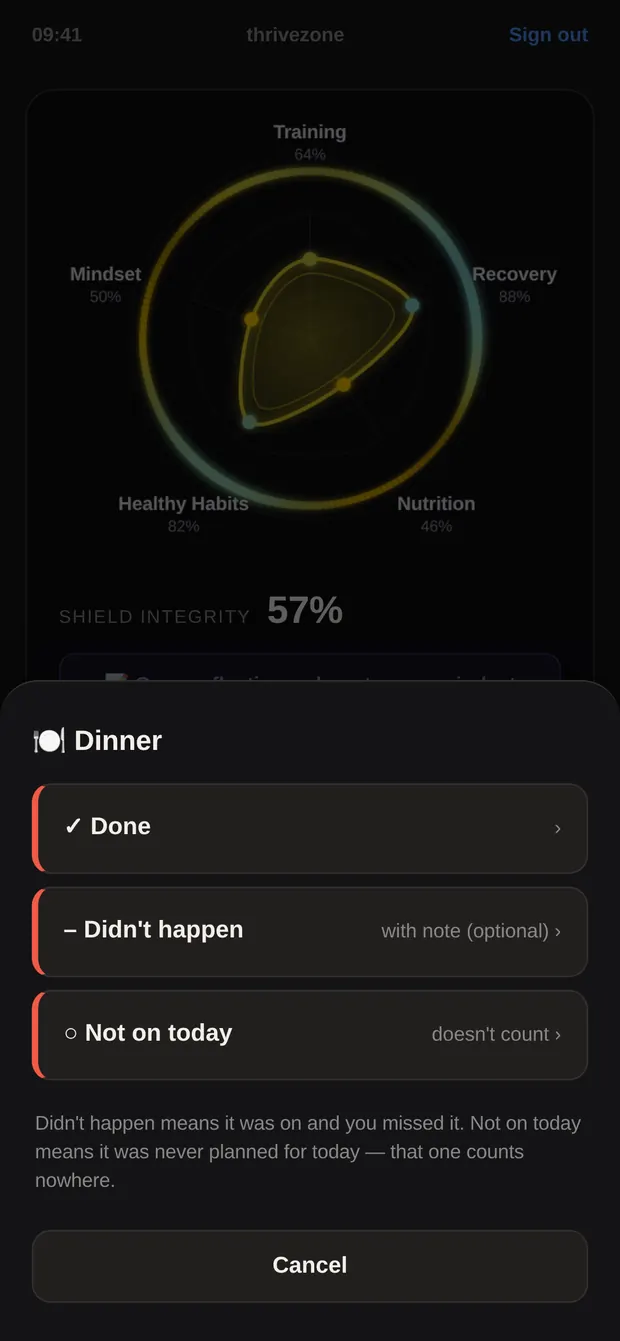
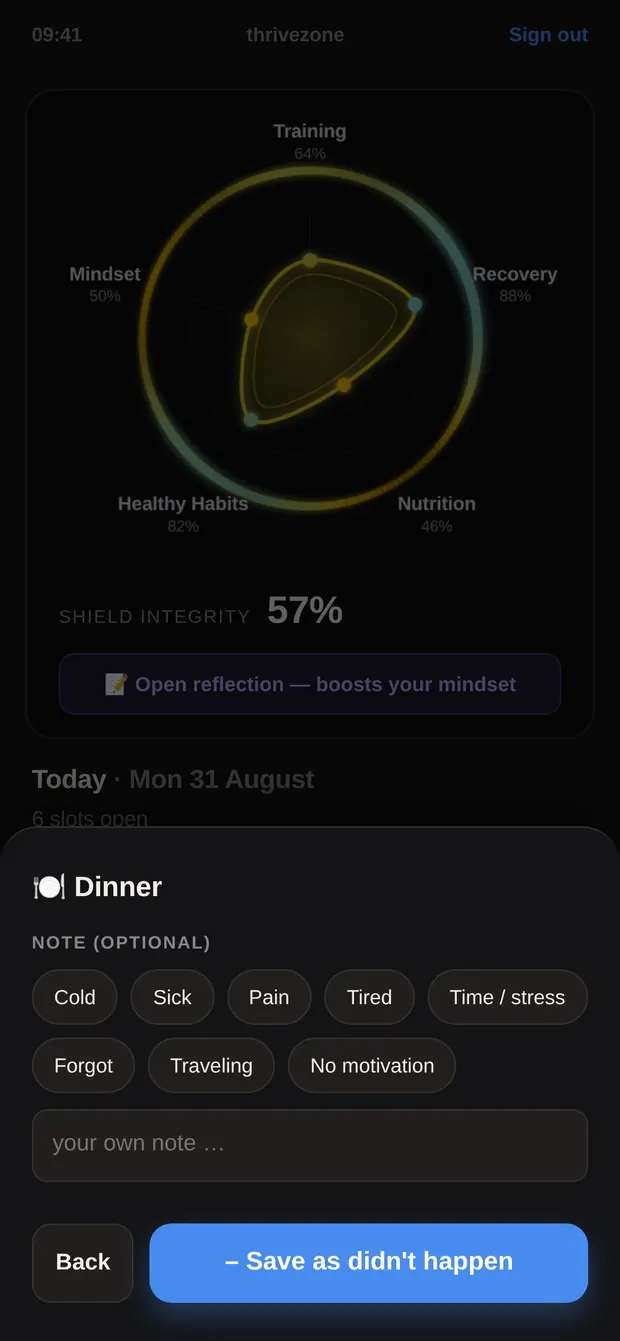
On big cards, the circle opens a window with three lines:
Once a status is set, a fourth line appears: ↺ Open — resets it.
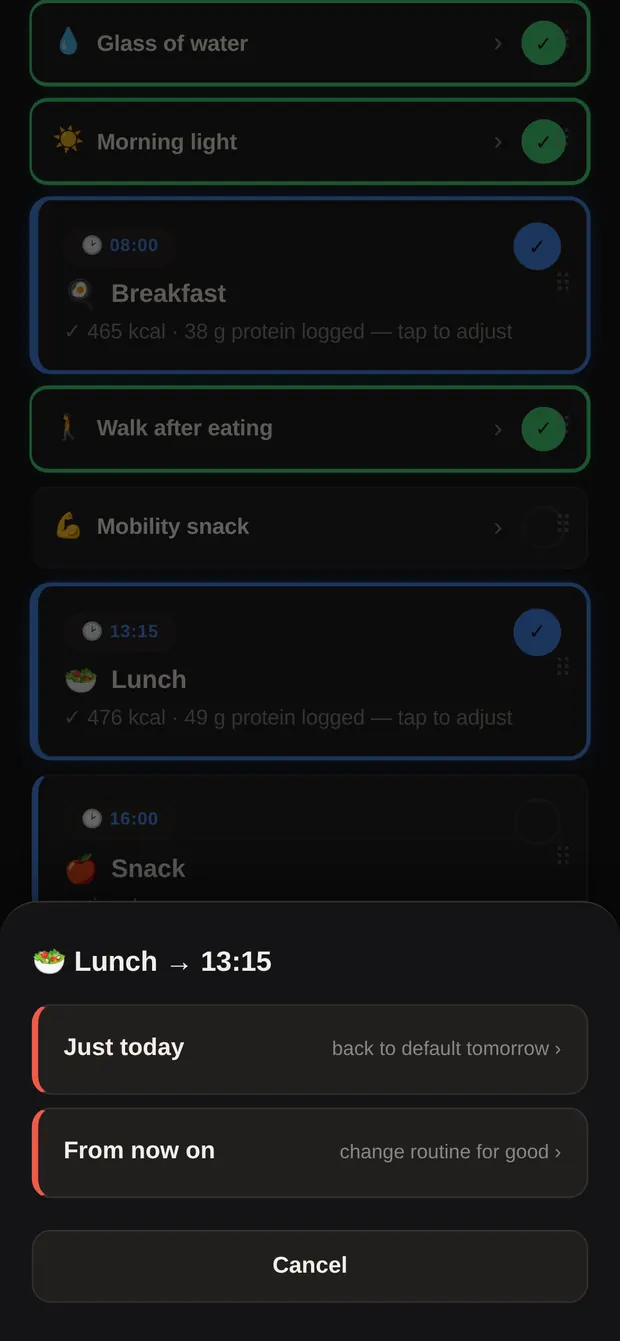
If a time doesn’t work today, tap the 🕑 time at the top of the card and set a new one. The app then asks:
You can also drag cards: press and hold the ⠿ handle on the right edge of the card briefly, then drag. The time adjusts to the new position and applies to today.
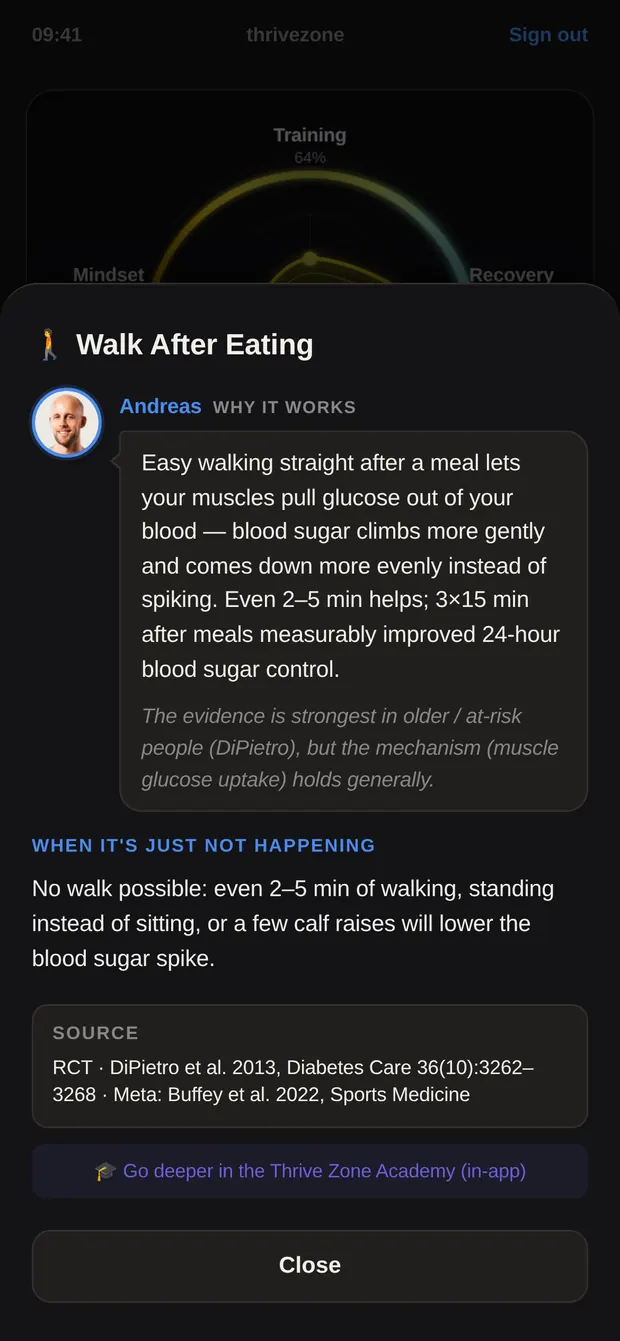
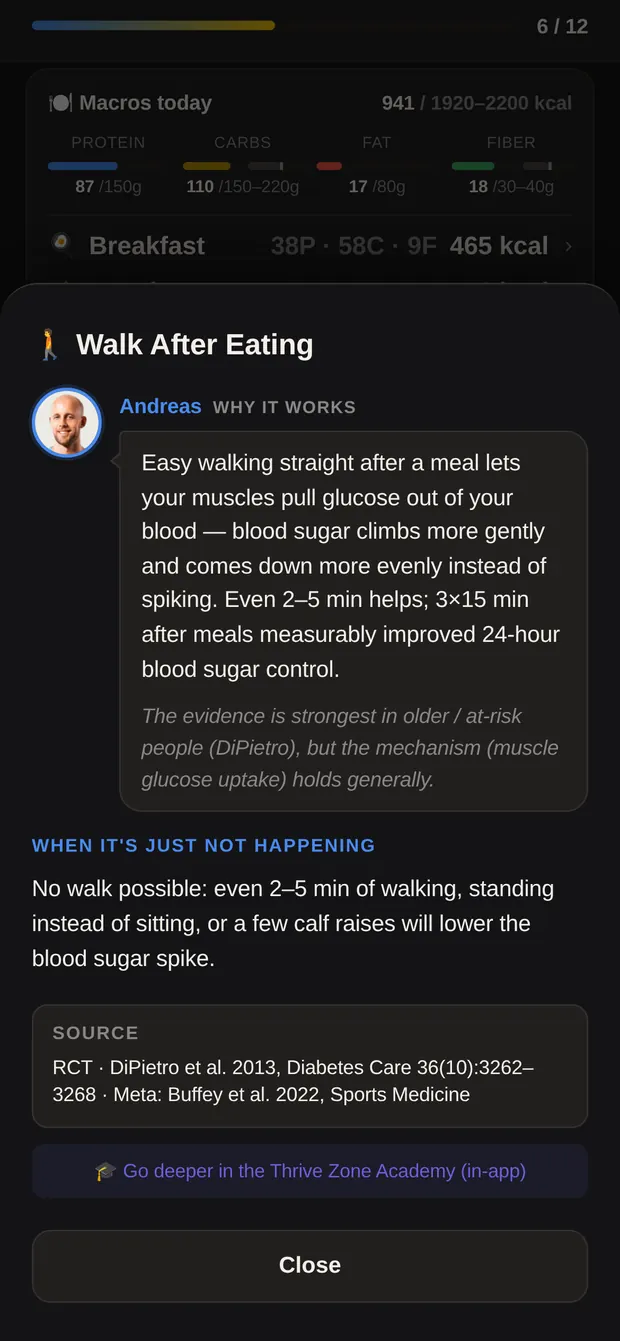
For most items you can read why they’re in your day. Tap “Source & details ›” in the open panel, or the ⓘ on a big card, and you get an info card: my explanation, how far the evidence actually carries, an alternative for awkward days, and the source itself with the type of study it was.
You don’t need any of that to use the app. It’s there for when you want to know why you’re doing something.
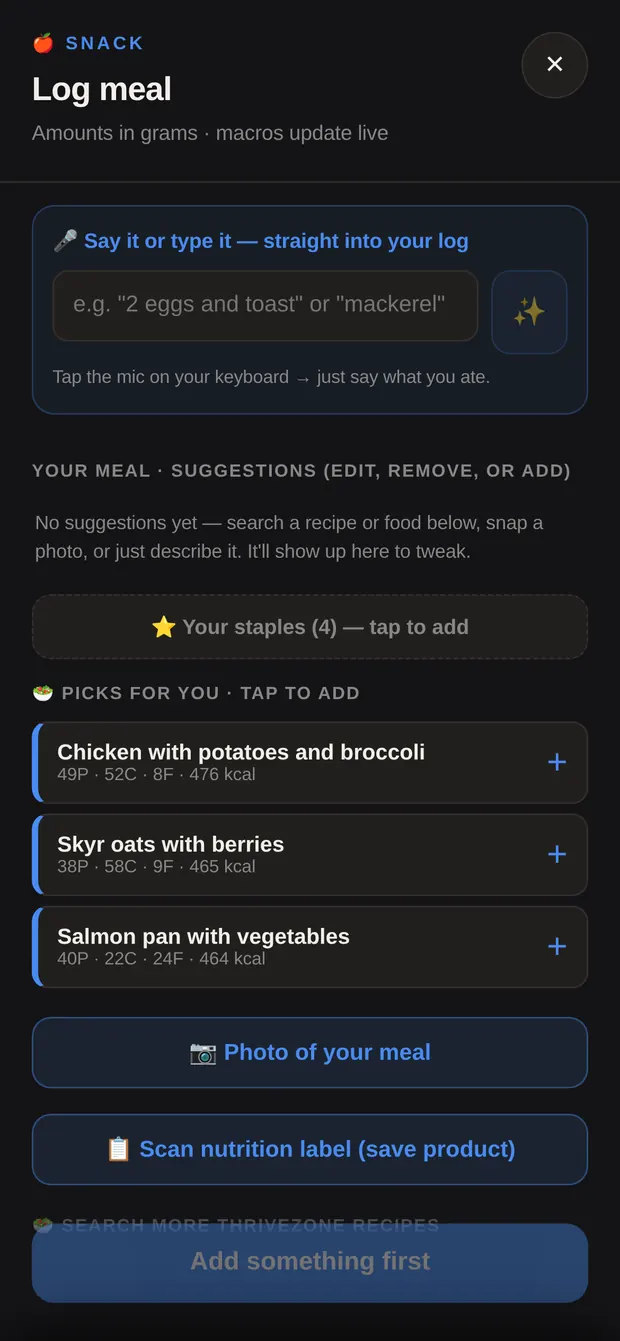
This is what you’ll do most, so here’s the long version. There are six ways to get a meal into the app — use whichever is easiest at the time. They all end up in the same log and can all be edited afterwards.
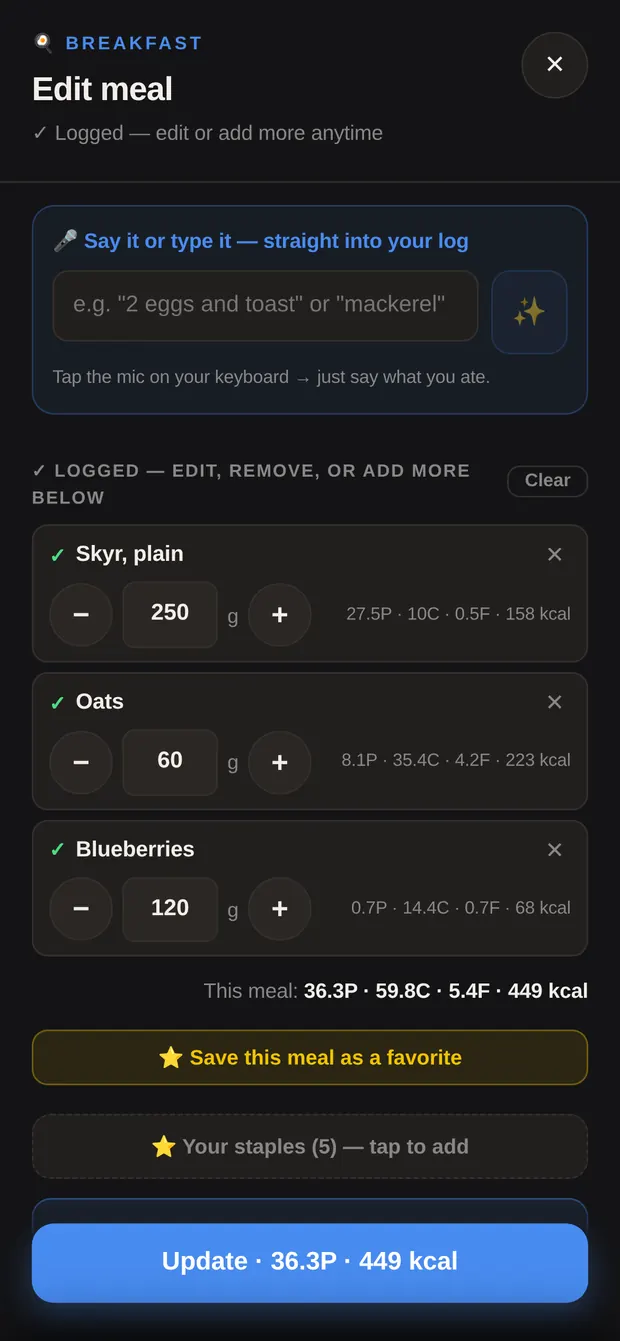
The header says “Log meal” — or “Edit meal” if something is already logged for that meal today.
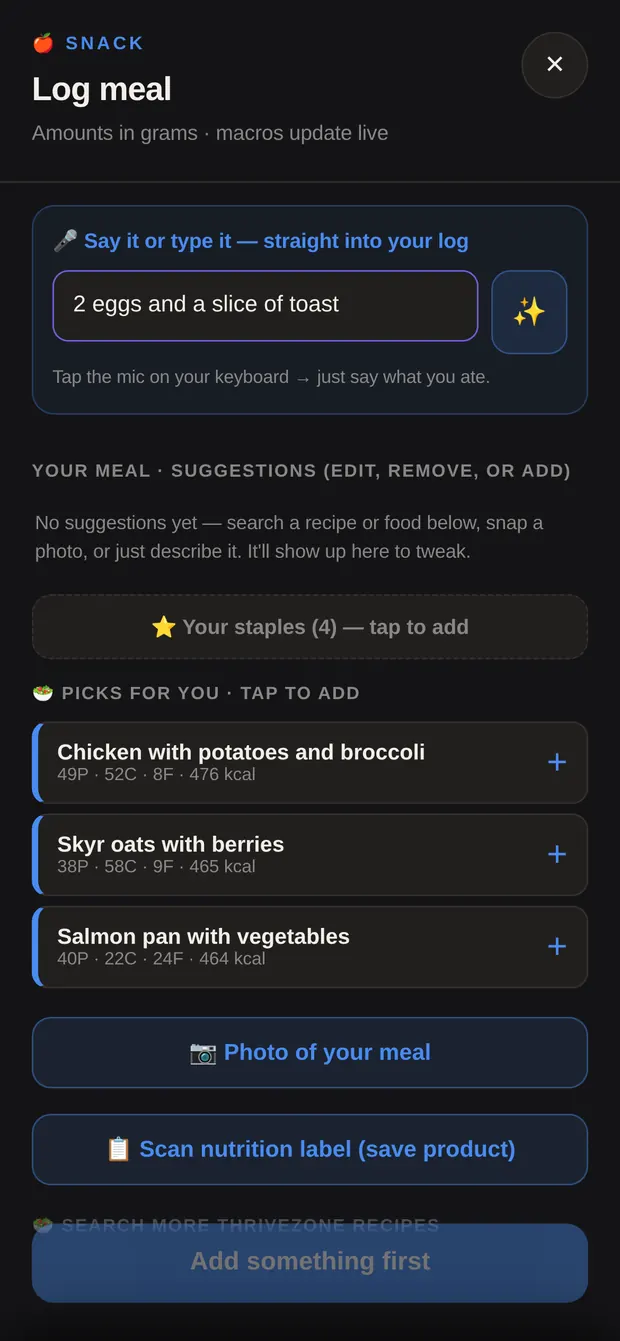
This is the one I’d recommend. At the top of the window sits the field “🎤 Say it or type it — straight into your log”. Nothing to look up, nothing to weigh, no list to go through — you just say what you ate.
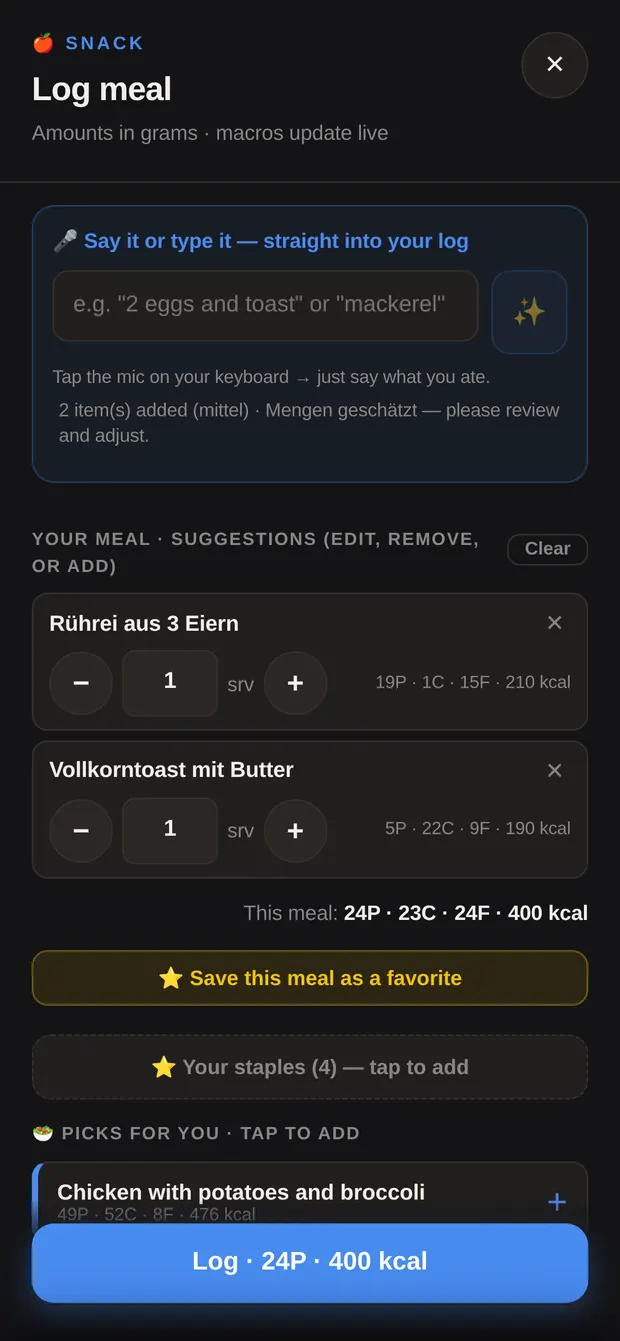
A few seconds later your meal is there as separate items, with nutrition values. That’s it.
You can give amounts, but you don’t have to. Leave them out and the app assumes a normal portion — and you fix it afterwards with − and + in two seconds.
Above the items it always tells you how confident the estimate was, e.g. “2 item(s) added (medium) — please check and adjust.” A quick look is enough.
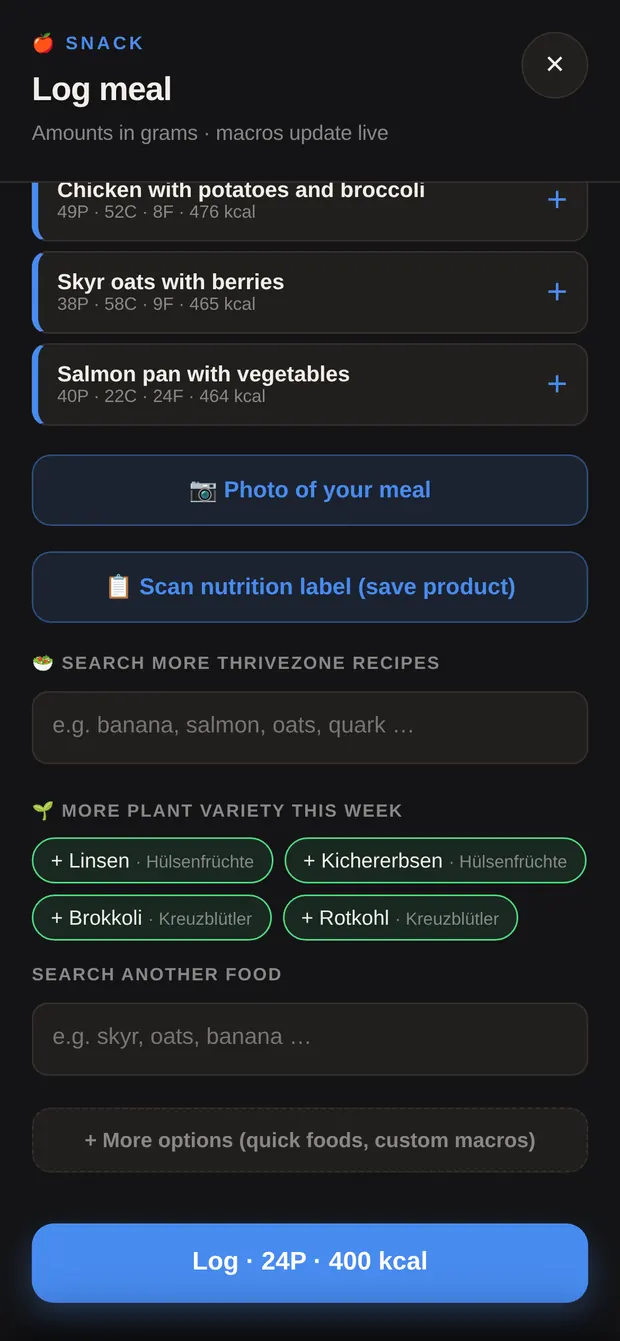
Everything you add shows up as its own card under “Your meal · suggestions (edit, remove, or add)”. You can edit each one separately:
The total sits under the items: “This meal: 24P · 23C · 24F · 400 kcal”.
Tap 📷 Photo of your meal and take a picture of your plate. The app breaks the meal into its parts and gives each one its own card, in grams. Remove anything it got wrong with ✕ and fix the amounts with − and +.
📋 Scan nutrition label (save product) lets you photograph the nutrition label on the packet. The values come in as an item — and the product is remembered. Next time it’s right there in the search, offline too.
Under “⭐ Your staples (n) — tap to add” are the foods I’ve set up for you with exact values, grouped by the meal they suit. One tap adds them with their standard portion.
You build your own favorites as you go: tap the star on a search result, or use “⭐ Save this meal as a favorite” at the bottom for a whole combination. Next time it’s one tap.
Under “🥗 Picks for you · tap to add” you get up to three recipes that suit this meal and what you’ve still got left for today. The search field “🥗 Search more ThriveZone recipes” gets you to the rest. Once something is logged for that meal the picks disappear — you’re done there.
If a pick shows “▸ Adjust ingredients”, you can leave things out or change amounts before you log it.
Under “Search another food”, results start appearing once you’ve typed two letters. It looks in your own catalogue first, then in a large food database. A ✓ means I recommended it; “saved” means you’ve used it before.
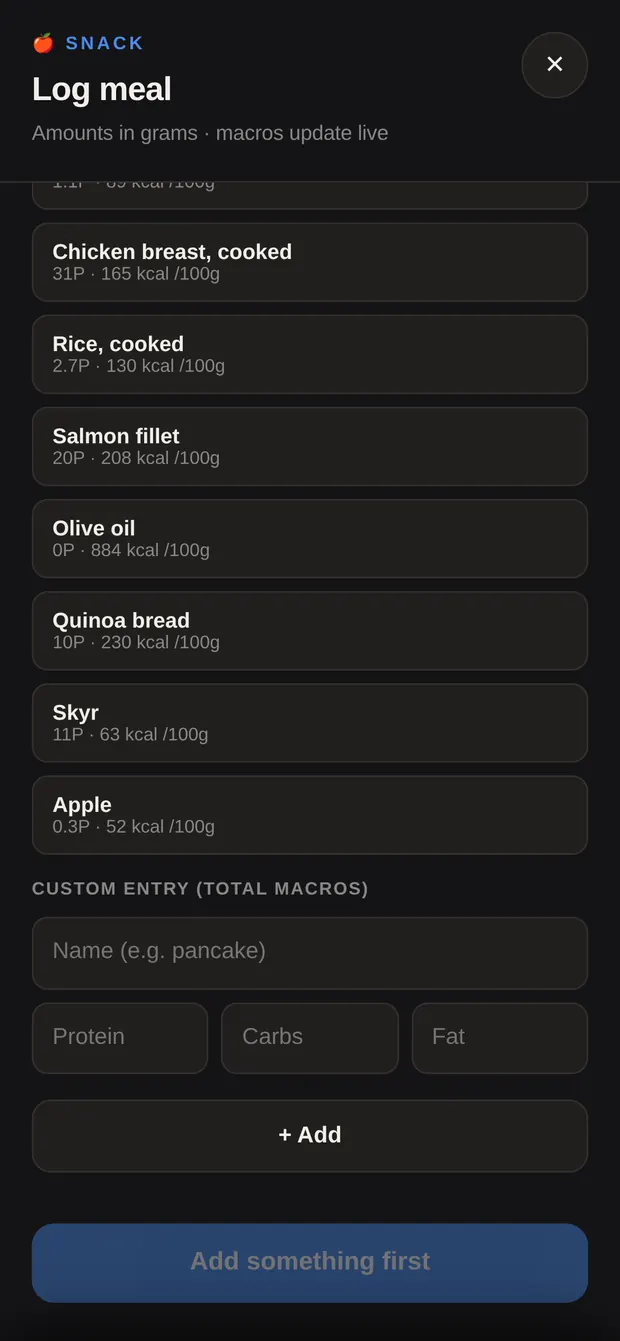
At the very bottom, “+ More options (quick foods, custom macros)” opens the quick foods (fixed values per 100 g) and the custom entry, where you type in the name, protein, carbs and fat yourself — for anything that isn’t listed anywhere.
If you often eat the same thing, “↩ Same as last time” appears at the top with however you logged it last time. One tap loads it all in, still editable.
The blue bar sits at the bottom. Once there’s something in the meal it reads “Log · 24P · 400 kcal” — or “Update” when you’re editing something already logged. One tap saves and closes; the numbers appear in your macros block straight away.
Logged something you didn’t actually eat? Open the meal again, remove every item with ✕, and the button turns into “Clear log (ate nothing)”.
If I’ve put a plan in the app for you, the red card says “▶ Start workout”. If you train with me in the studio and use the app for food only, it says “✓ Training done” instead — just a tick box, so the rest of this chapter doesn’t apply to you.
Tap ▶ Start workout. If your plan has more than one workout (A and B, say), the app first asks “Which workout today?” and shows how many exercises each one has.
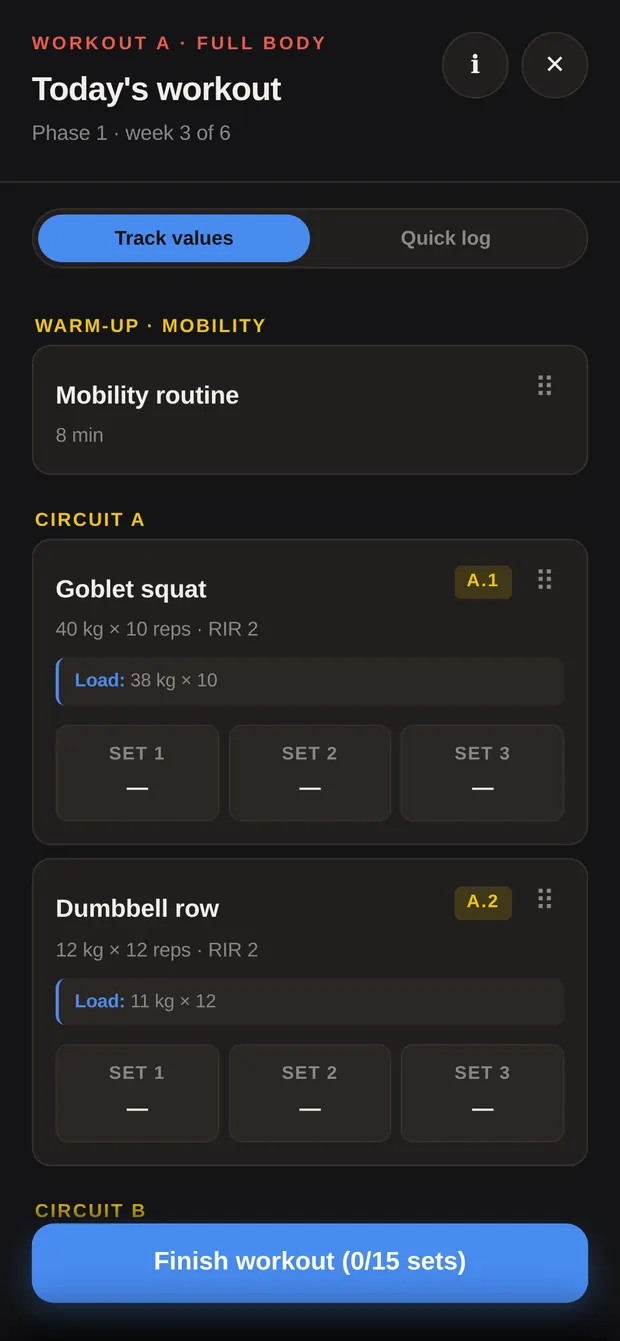
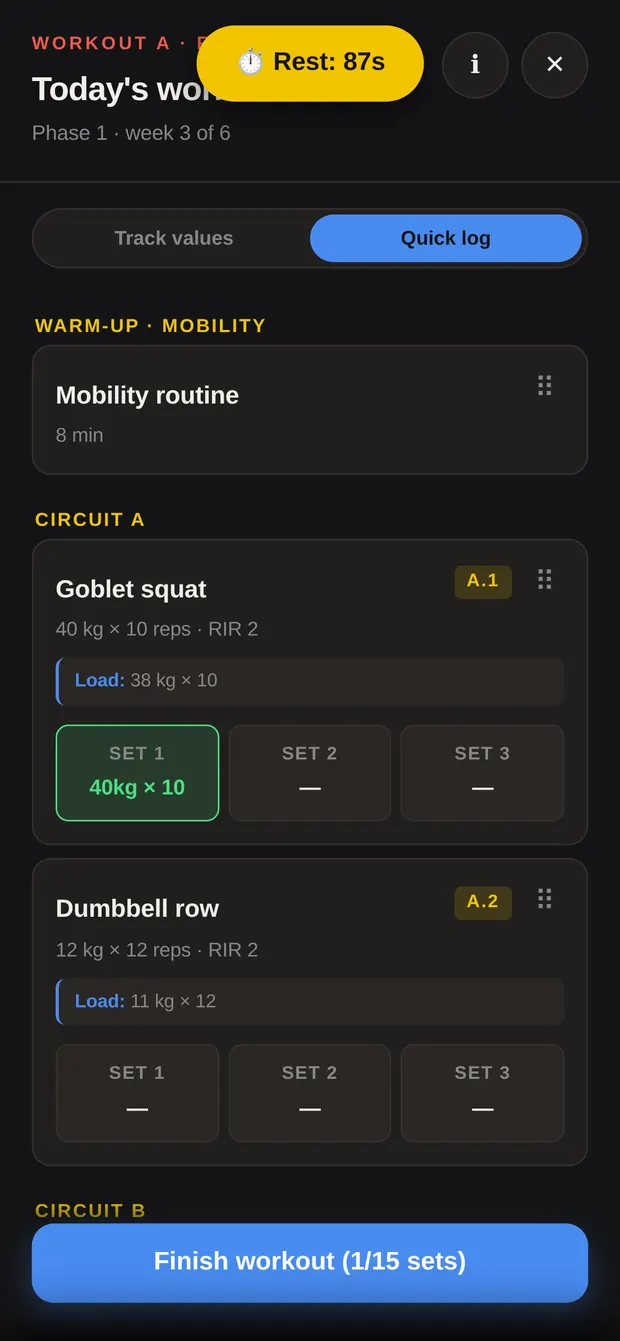
Inside you see the workout name at the top, then “Today’s workout” and your current phase, e.g. Phase 1 · week 3 of 6.
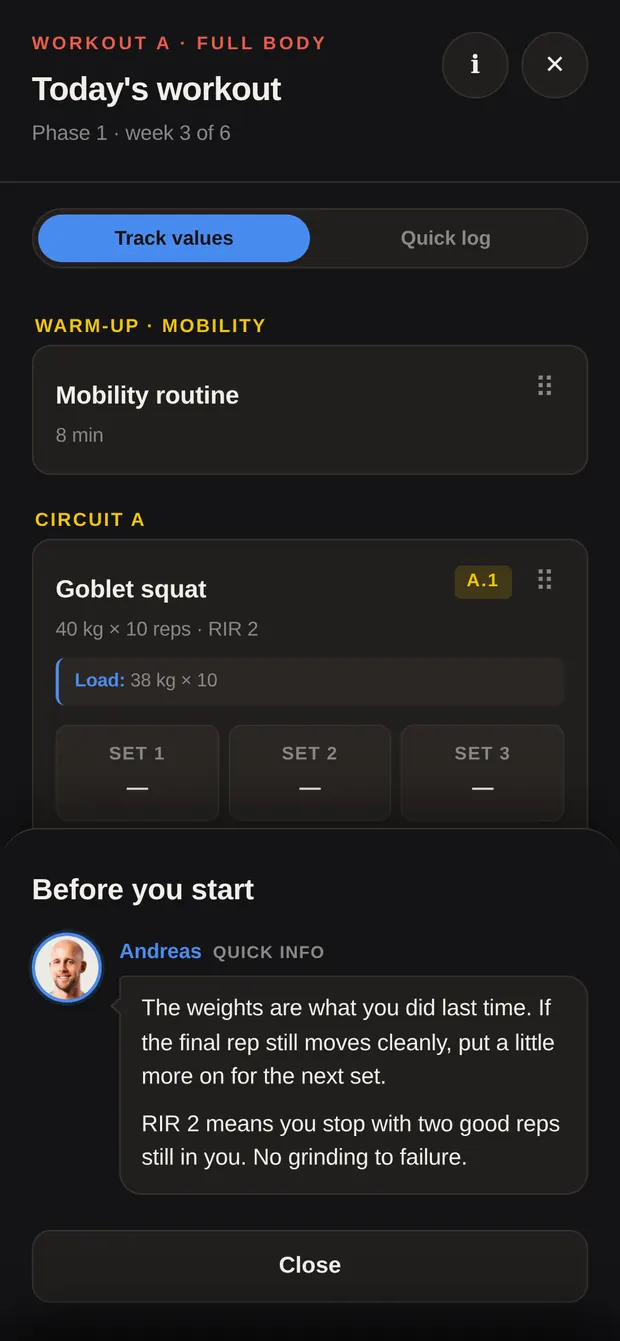
If there’s an ℹ at the top right, I’ve written you a short note on this plan — rep ranges, when to add weight, what to watch. Read it the first time round.
Headings sit above the exercises: Warm-Up · Mobility, then Circuit A, Circuit B and so on — or Main block for an exercise that isn’t part of a circuit.
The label on the right of each exercise tells you how to run it:
Under each name is what I’ve set you, e.g. 40 kg × 10 reps · RIR 2. RIR 2 means you stop with two clean reps still in you.
The blue “Last:” line shows what you did on that exercise last time — your anchor for today’s weight.
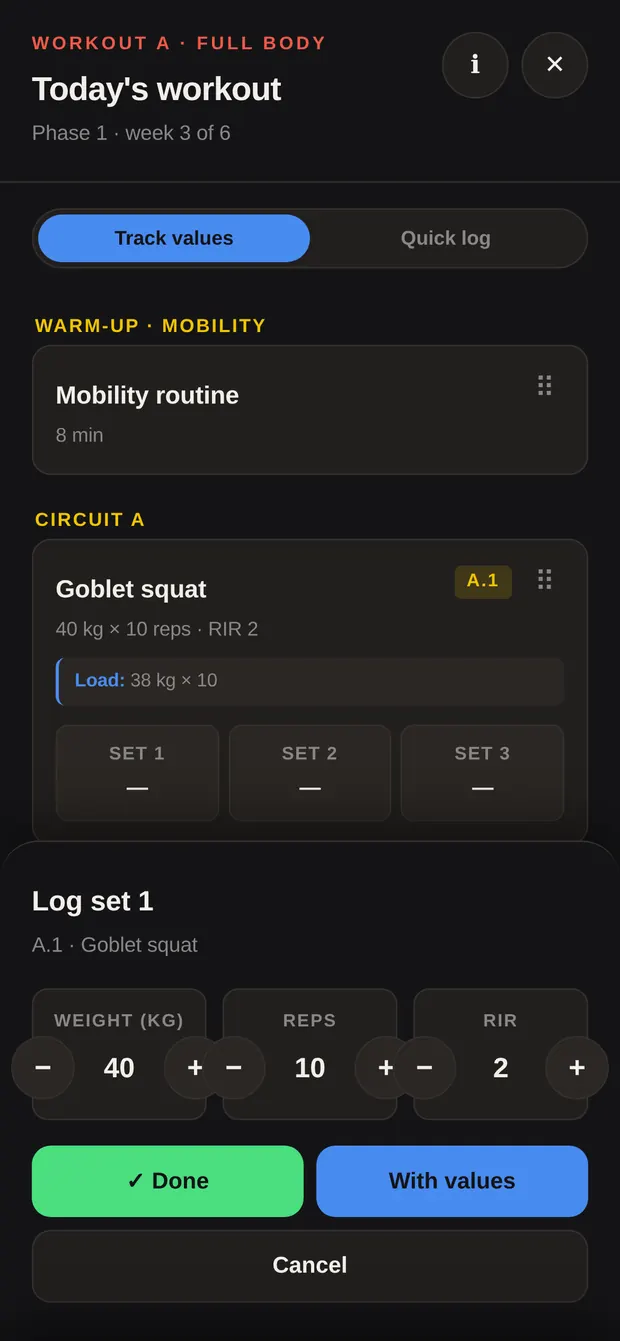
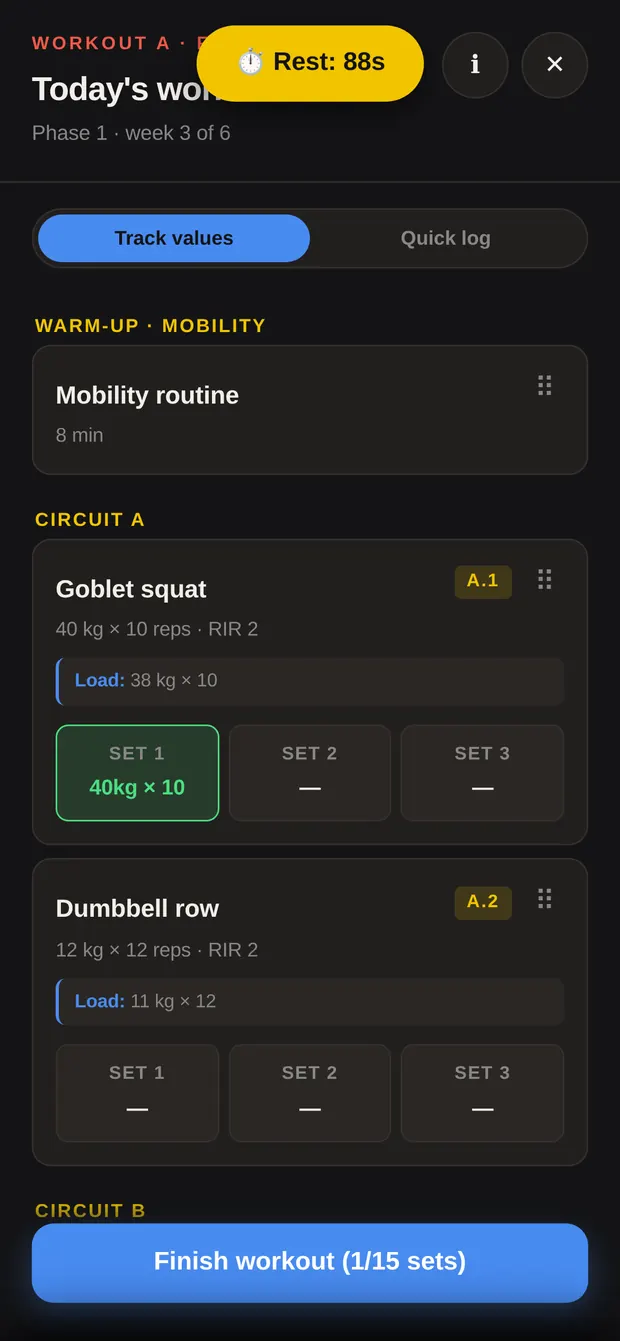
Two buttons at the top. “Track values” is on by default.
Tap a Set 1 tile. “Log set 1” opens at the bottom with your fields — Weight (kg), Reps, RIR, or Duration (sec) on timed exercises. Everything is pre-filled with my prescription; − and + adjust it.
Switch to “Quick log” and a tap on a set tile saves it immediately, no input box. Good when you’re training exactly to plan and want to stay in the flow.
After each set, “⏱ Rest: 90s” appears at the top and counts down. It’s a guide — carry on whenever you’re ready.
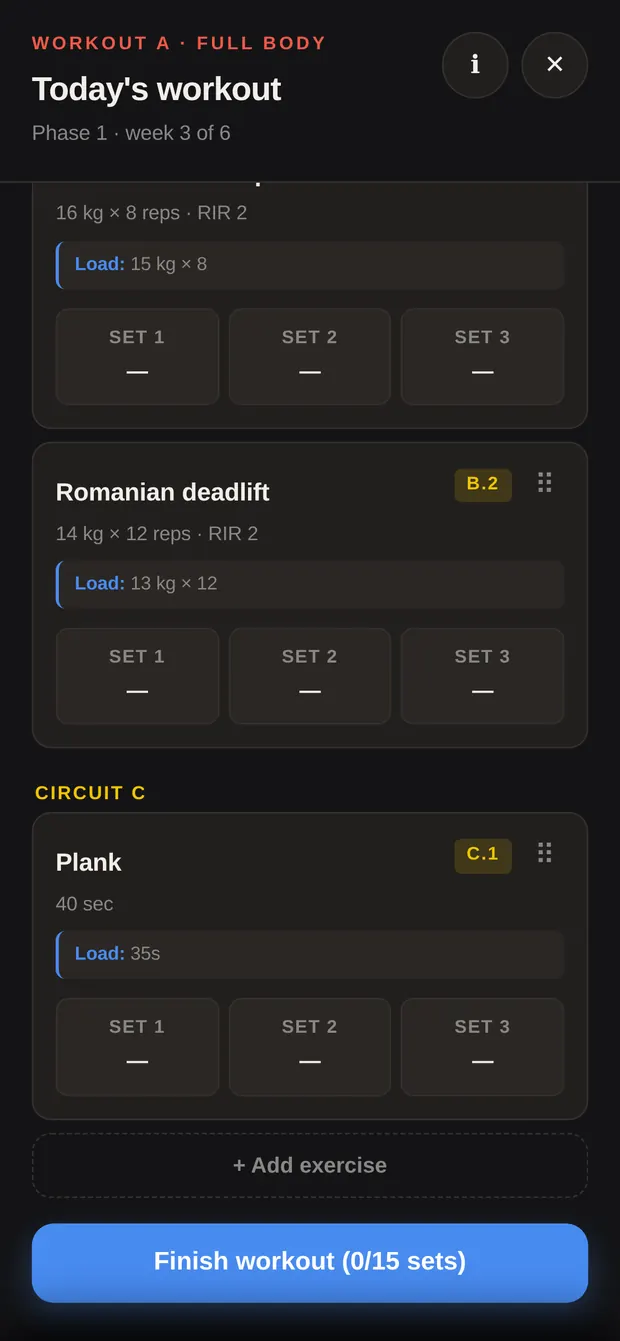
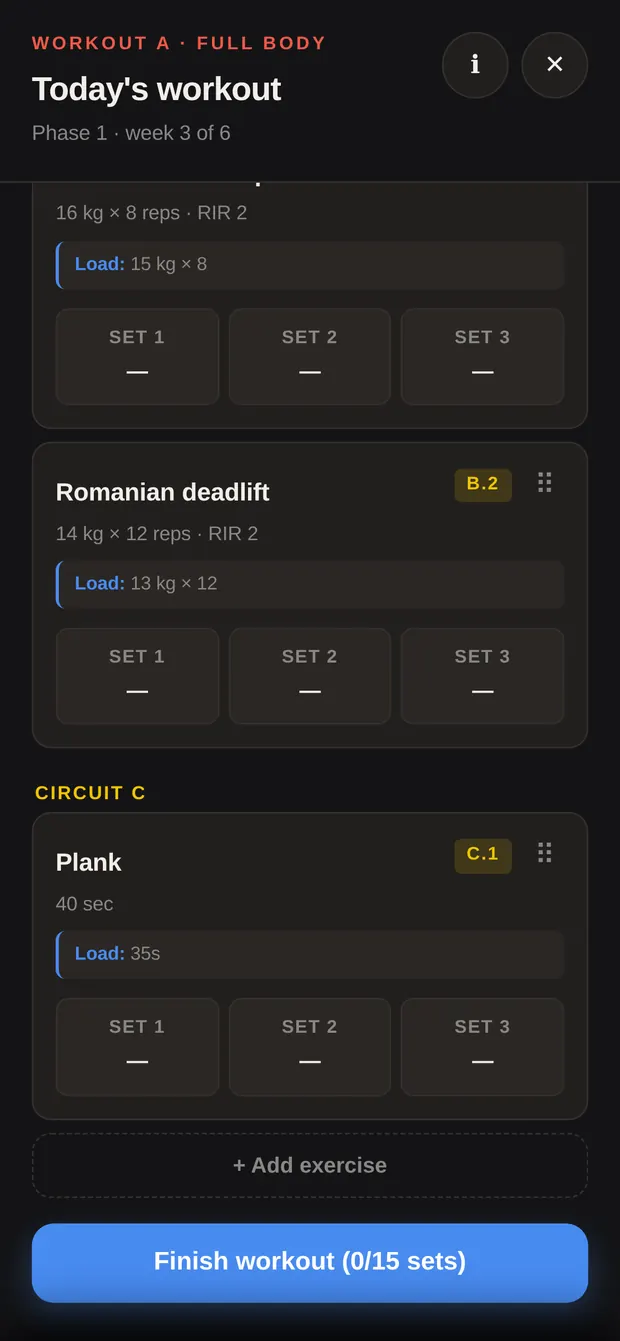
Under the list sits “+ Add exercise” — for anything you throw in on the day. Type a name, set the number of sets, “Add”. It shows up under Extra exercises and counts towards your total. Your plan stays untouched.
To reorder, use the ⠿ handle on the right: press and hold briefly, then drag.
At the bottom: “Finish workout (3/15 sets)” — and “🎉 Finish workout” once every set is in. That ends the session, closes the window and ticks off the training card in your day. The app then asks briefly how the session went (Part 7).
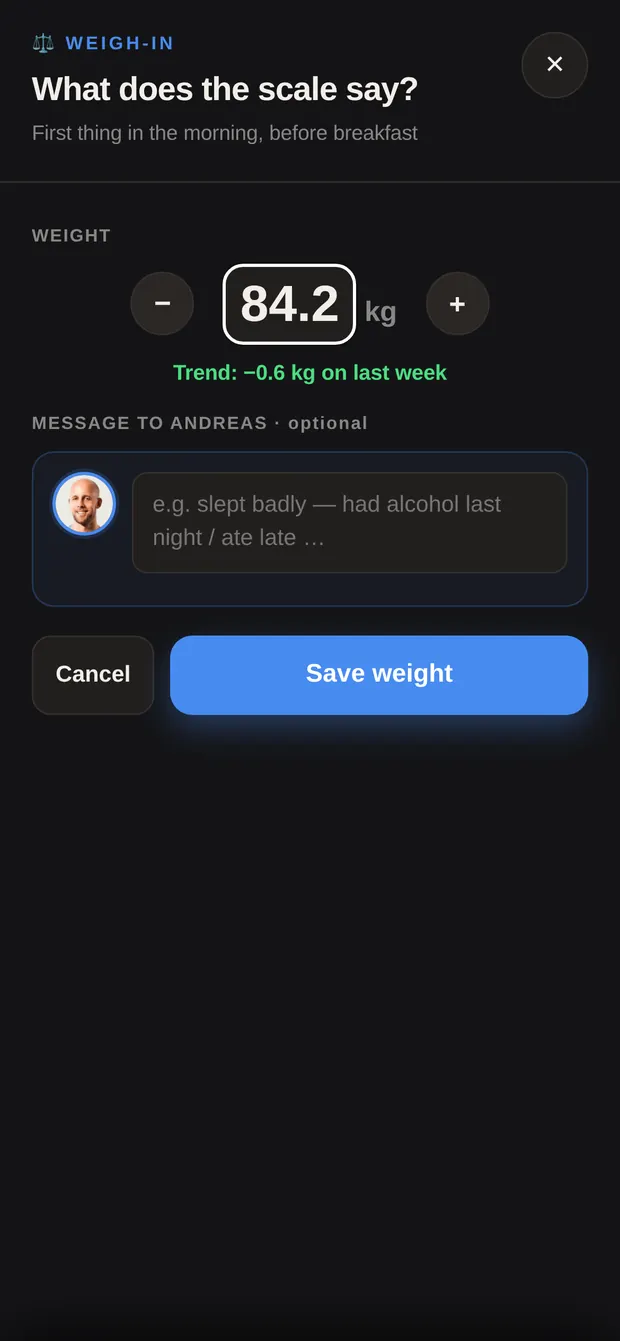
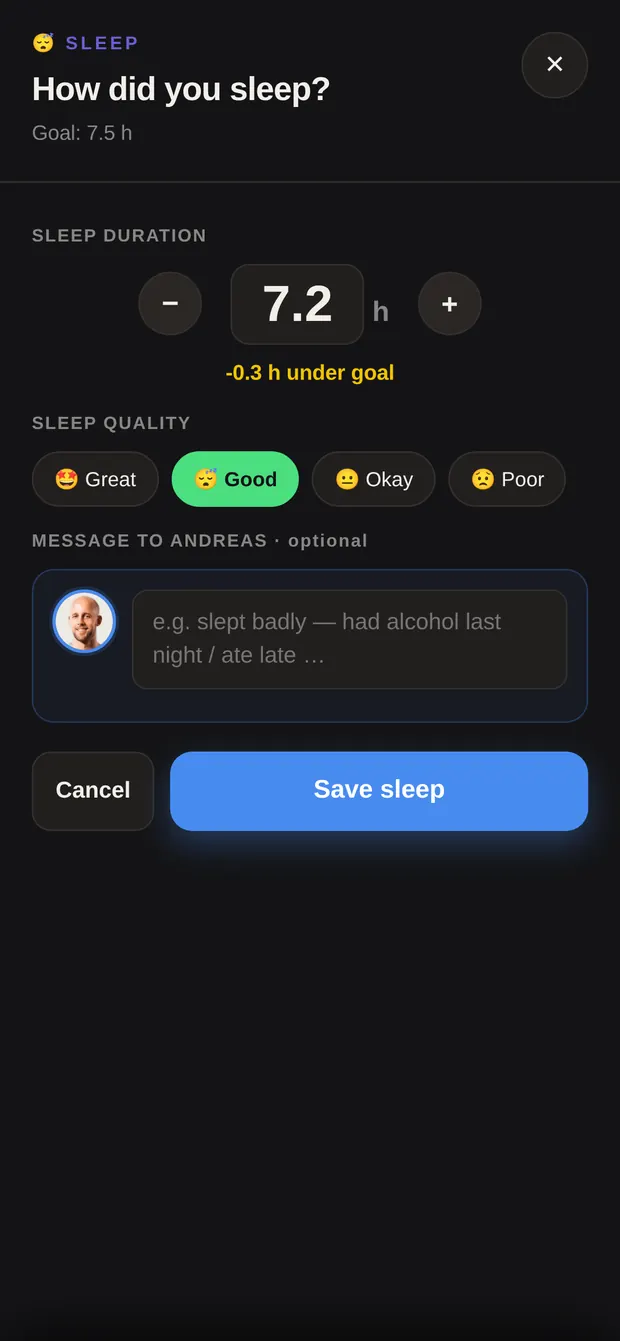
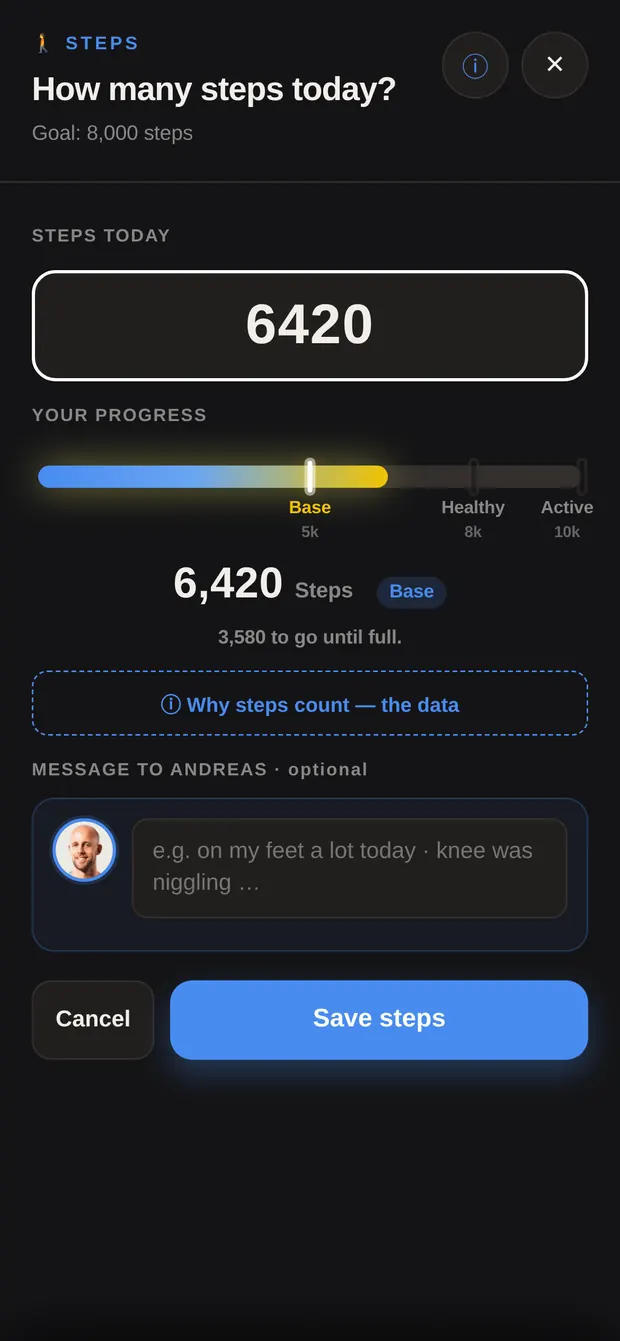
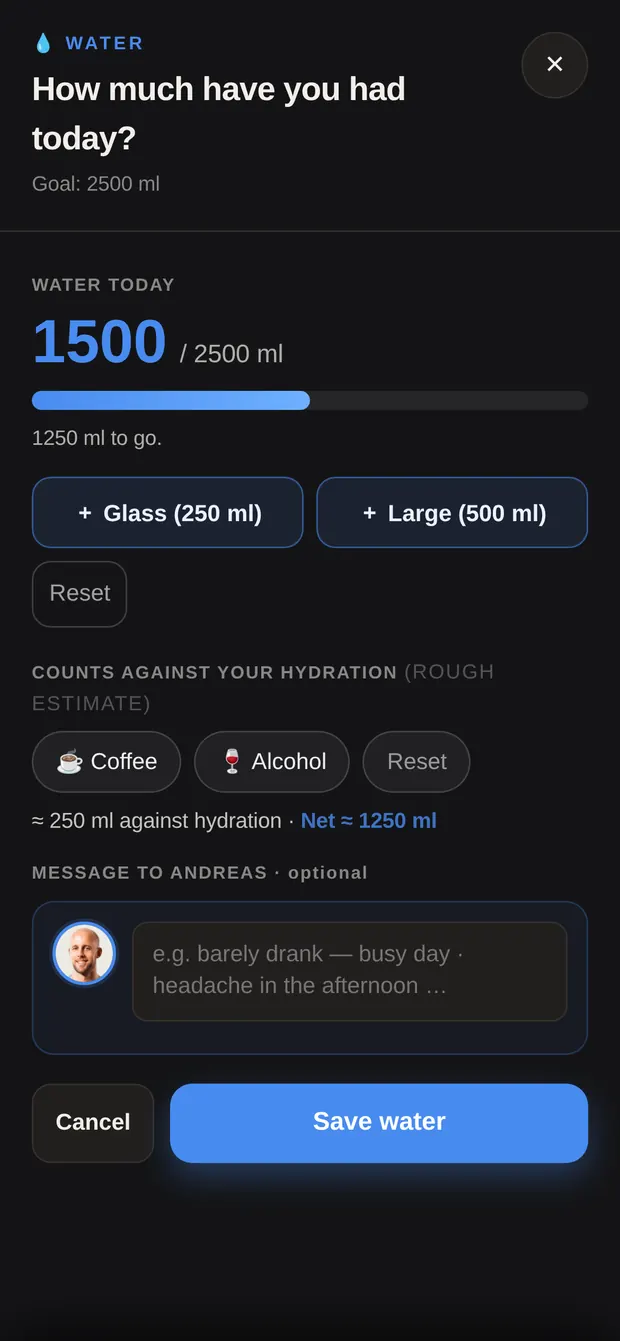
Four small windows, all built the same way: put the number in, save at the bottom. At the bottom of each one there’s a field with my photo beside it — “Message to Andreas · optional”. Whatever you write there comes to me when you save. Leaving it empty is fine.
Tap the circle on the right of the weigh-in row. − and + move in 100-gram steps, or type the number straight in — commas and full stops both work.
Under the field you get the context, depending on how much data there is:
Same again: tap the circle on the right of the sleep row. Two things go in:
Under the duration you see where you landed: “✓ Goal reached” or “-1.5 h under goal”.
Tap the “Steps today” card. Put in the number from your Health app or watch — digits only.
Underneath, a line runs across with three marks on it: Base 5k, Healthy 8k, Active 10k. That line always runs to 10,000, whatever your personal goal is. The card on the home screen measures against your goal — which is why the two bars rarely match up.
“ⓘ Why steps count — the data” takes you to the reasoning behind it.
Tap the “Water today” card. No number field here — buttons instead:
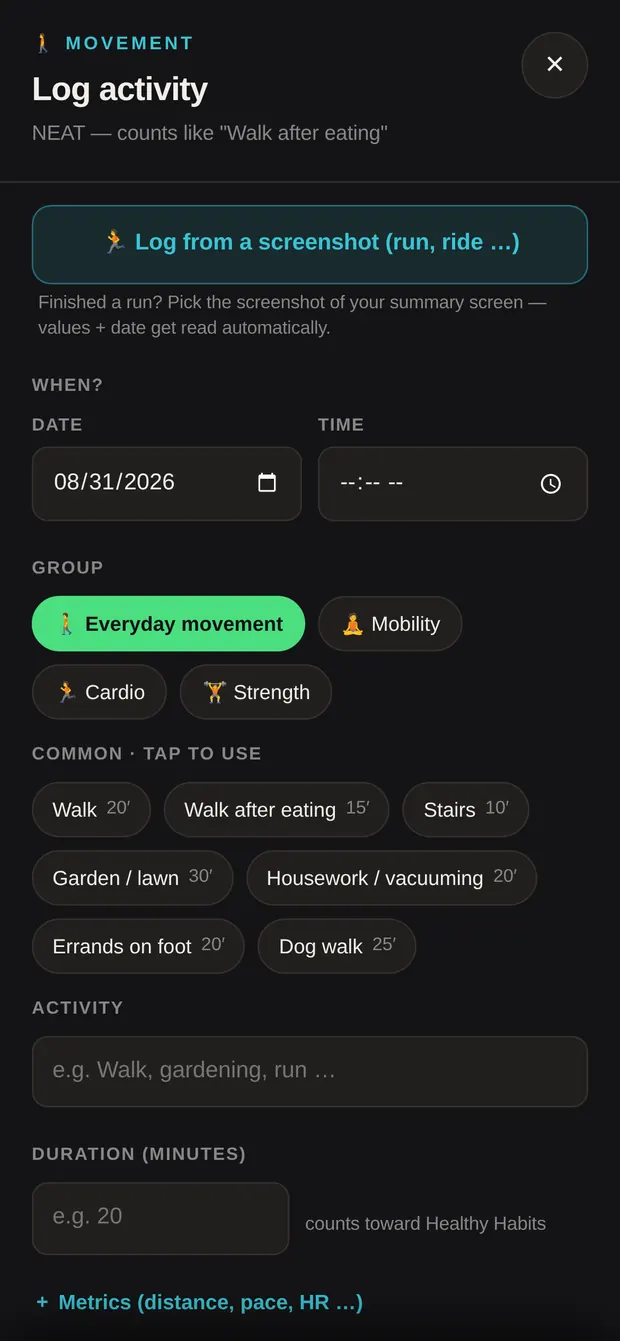
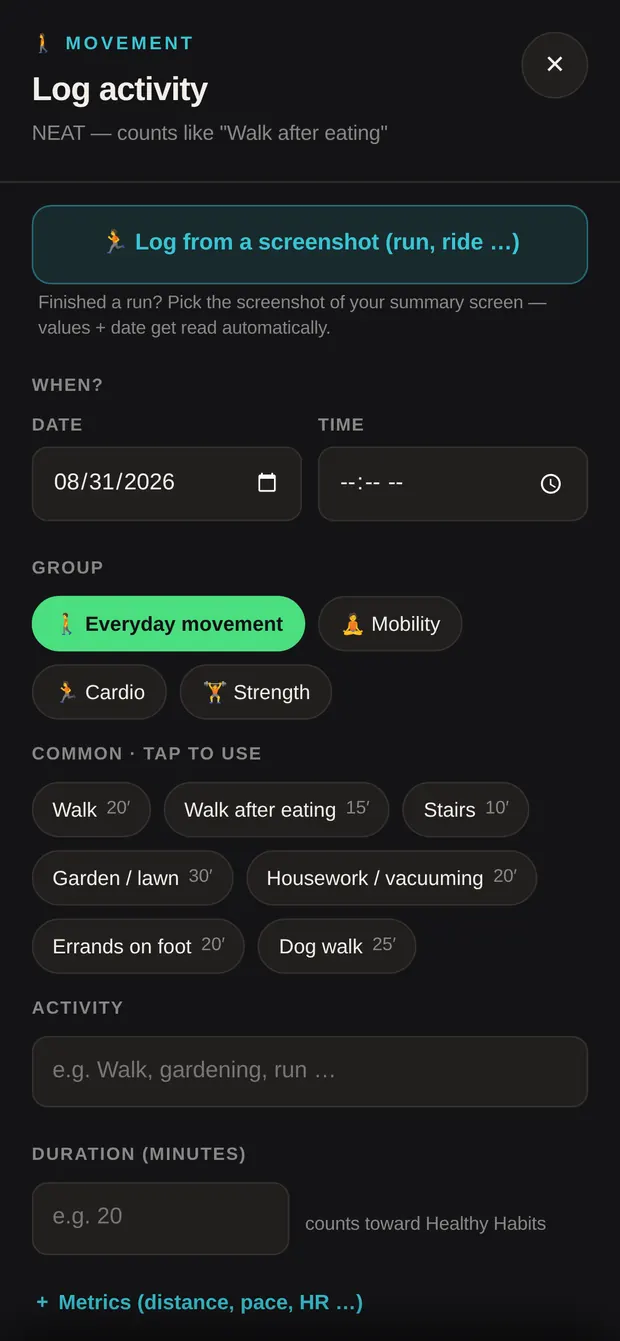
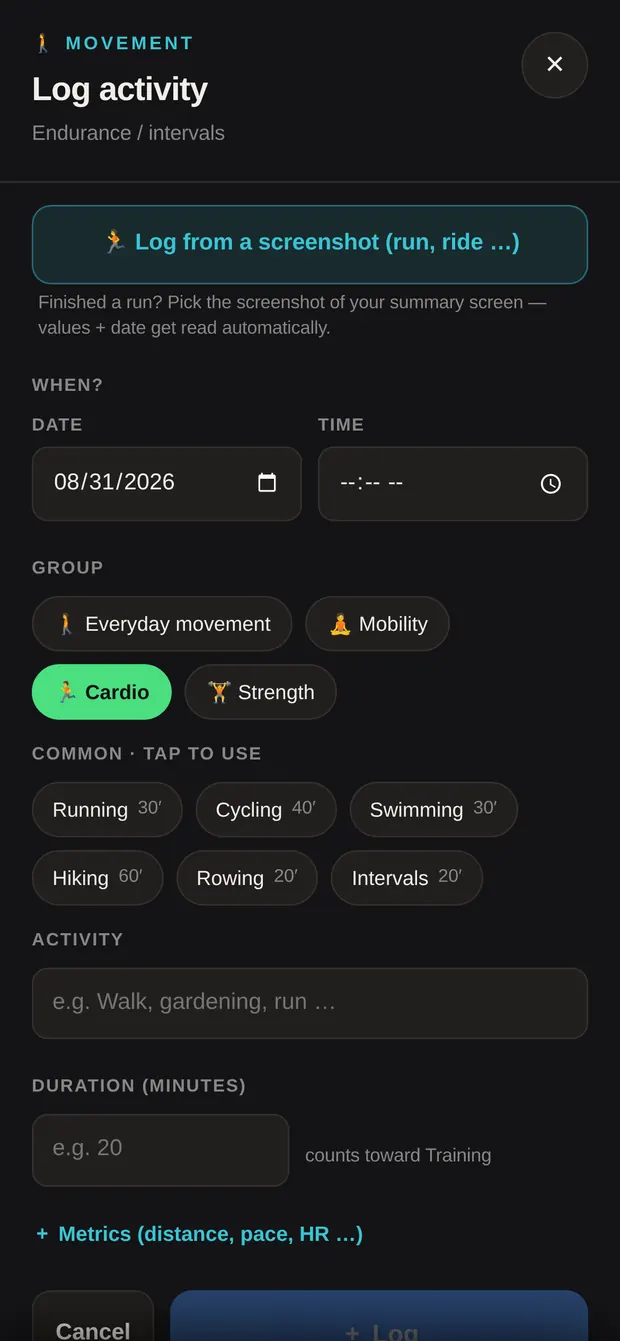
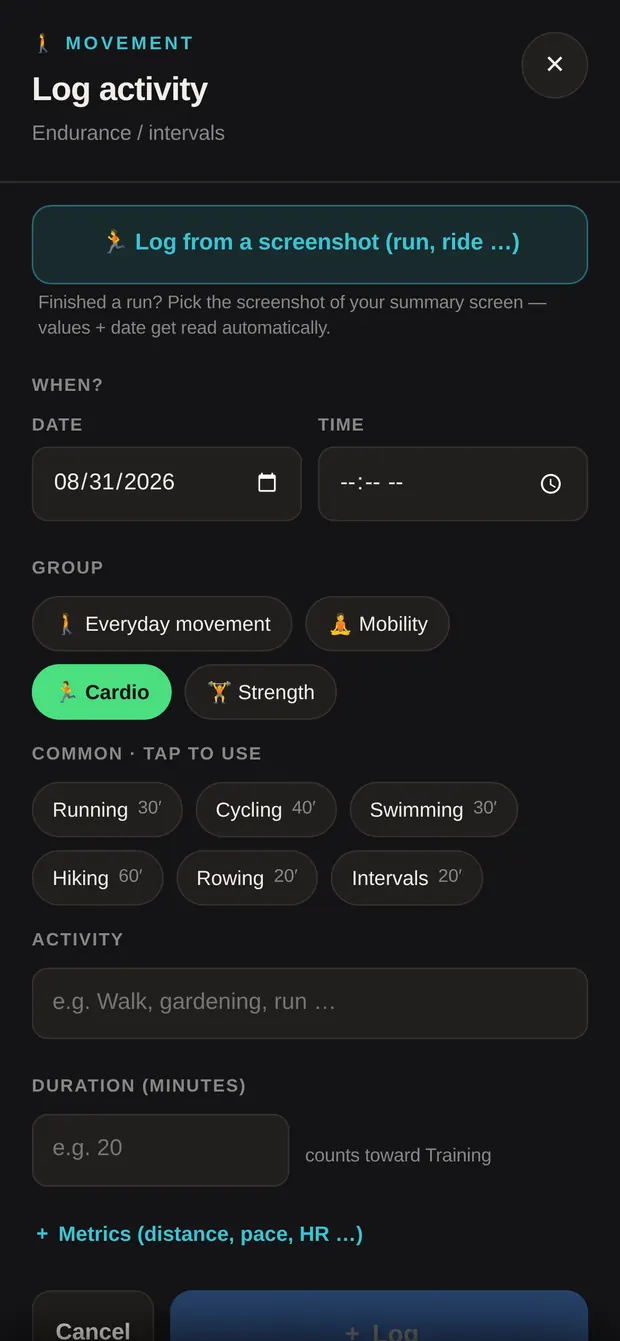
Tap + 🚶 Activity at the top, or open it from a movement card in your day (walk, mobility), in which case the group is already filled in.
In order:
“+ Log” at the bottom. Without a name the button stays grey.
Keep tracking runs and rides with whatever you already use — Strava, Nike Run Club, Apple Fitness, Garmin, Komoot. Then:
The app reads the sport, duration, distance, pace, heart rate, calories and elevation from the image and fills in the fields. If there’s a date on the screenshot, it files the session on that day — even if you get round to it later. You’ll see something like “Read (high) · 📅 auto-set to Sat 30 Aug — check the values and add it.”
Every value stays editable — give them a quick check, then “+ Log”.
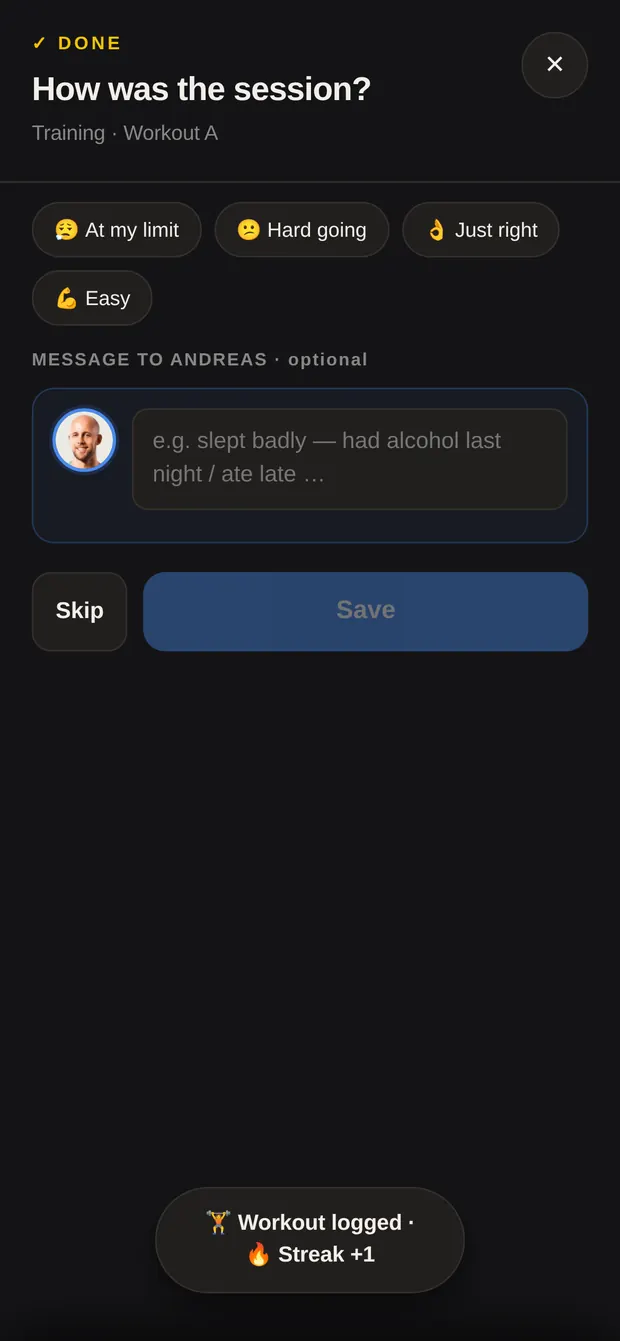
As soon as a training, mobility or cardio session is done, the app asks once how it went: 😮💨 At my limit · 😕 Hard going · 👌 Just right · 💪 Easy. You can add a line for me.
It comes up after “Finish workout”, after you tick off a mobility or cardio row, and when you set a session to “✓ Done” through the status circle.
It’s optional — “Skip” is perfectly fine, the tick is already saved. But it’s the fastest feedback I can get from you: over a few weeks it tells me whether the load is sitting right.
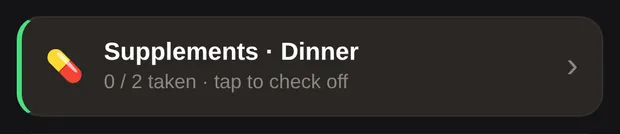
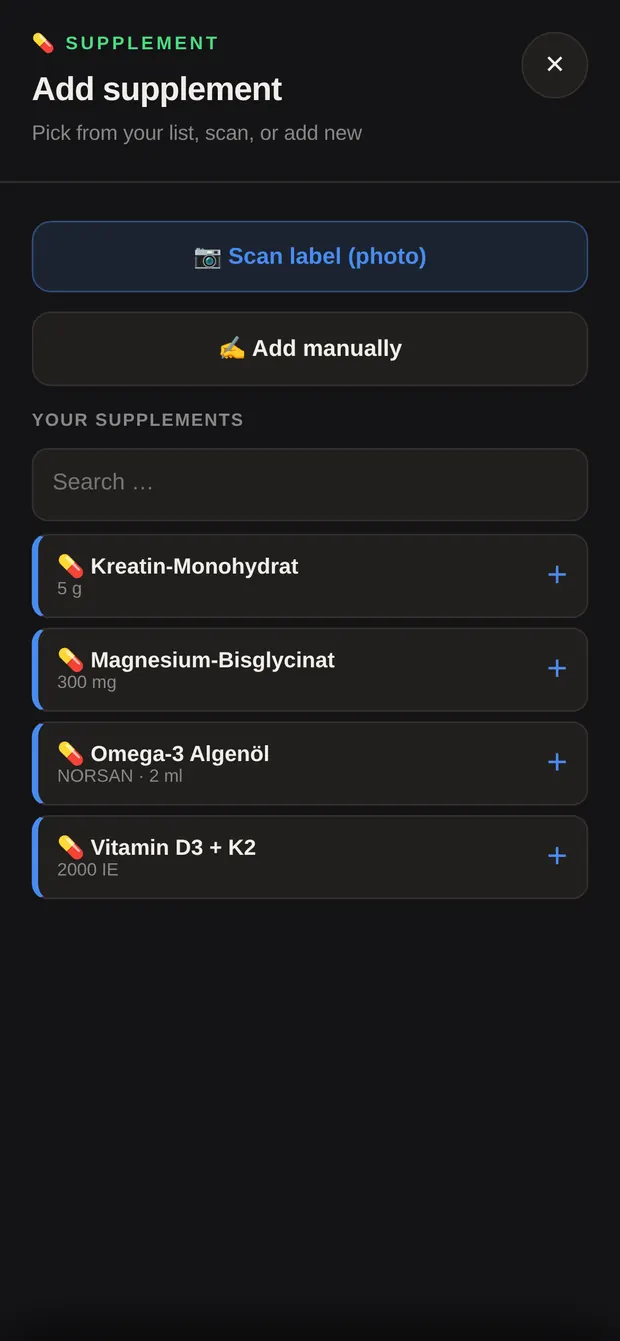
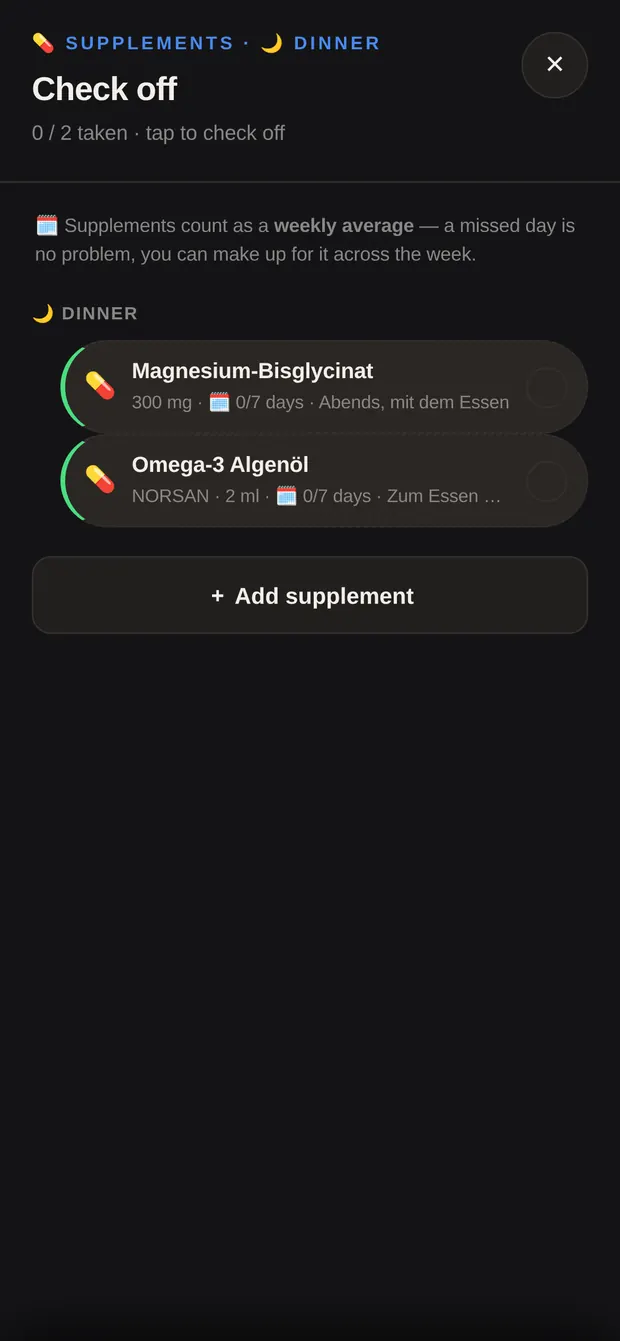
Whatever I’ve put on your list turns up as a green card right after the meal it belongs to — e.g. “Supplements · Dinner · 0 / 2 taken”. Tap it to open the list.
Tap each one to mark it taken; tap again to undo. Each shows its dose and your week so far, e.g. 🗓 5/7 days.
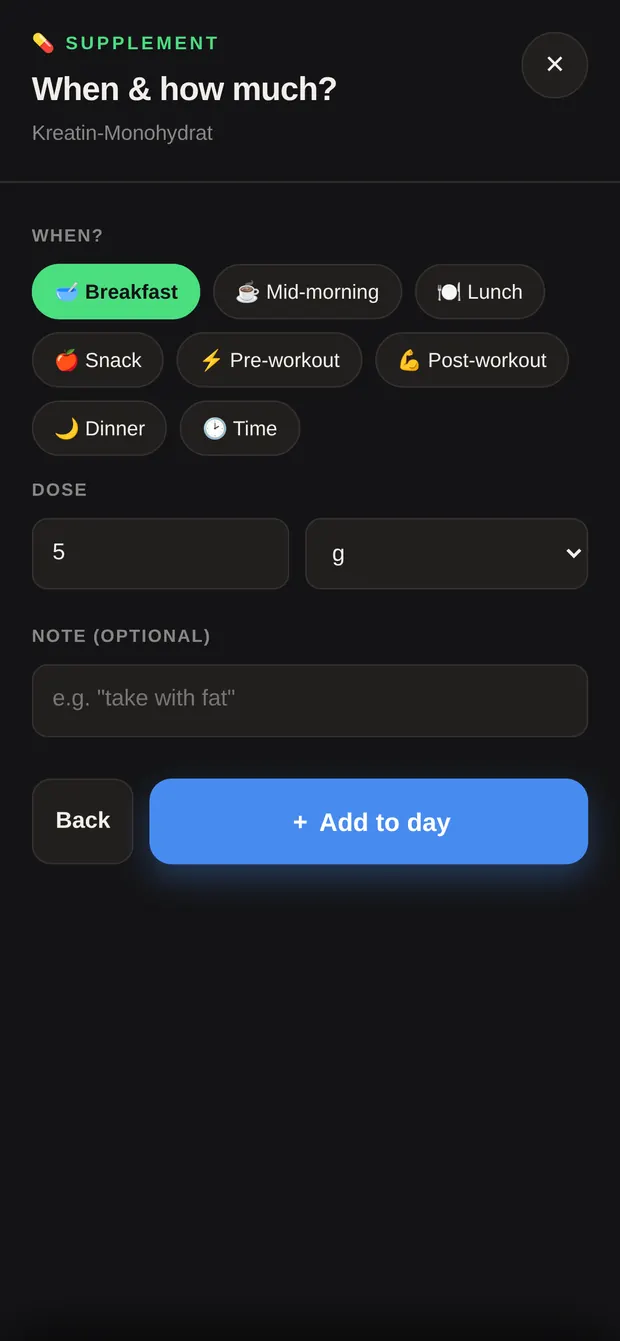
Taking something I haven’t set up? Use + 💊 Supp. It’s three steps:
Then “+ Add to day” — it’s in your daily list from now on.
Anything you added yourself, you can take back out of the day with the ✕ in the list.
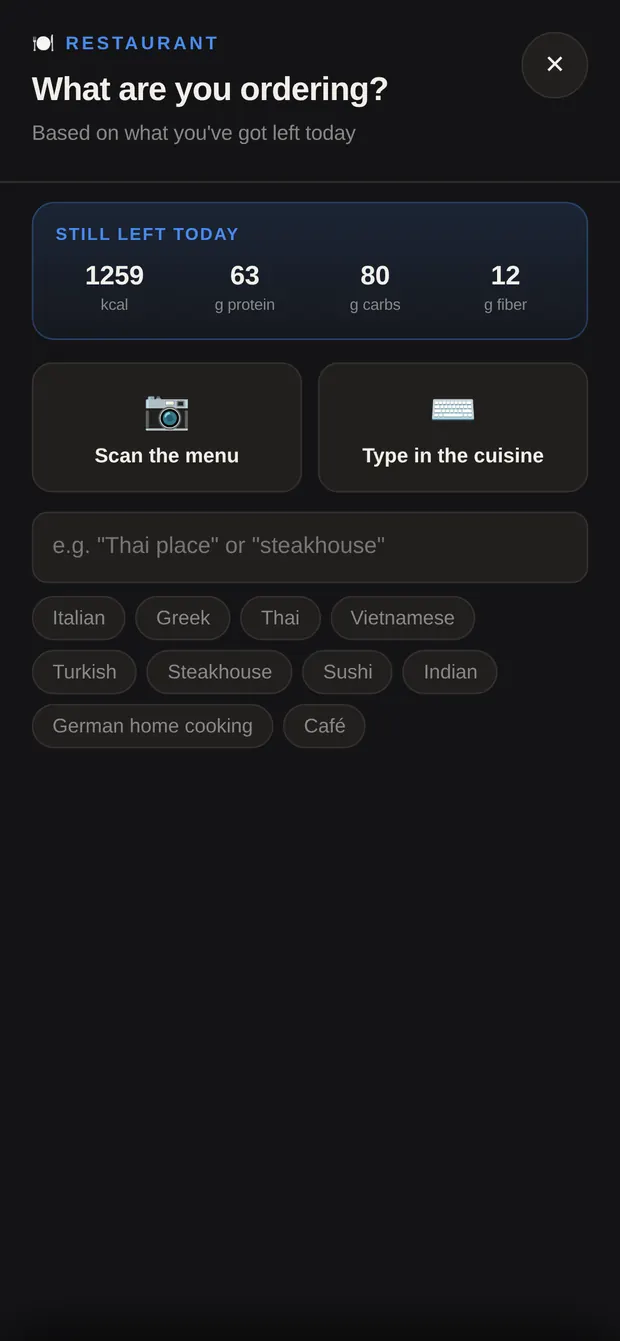
Tap + 🍽 Restaurant. At the top you’ll see “Still left today” — what’s left of your calories, protein, carbs and fiber. Everything below is worked out against that.
Two ways in:
You get up to three dishes that best fit what’s left of today, with their numbers and a short reason (“covers the protein you still need”, “brings in a plant family you’re still missing this week”). “Show the whole menu (n more)” opens the rest.
Under “How to order it” are tweaks you can tap — swap the side, ask them to leave the sauce off, ask for a bigger protein portion. The numbers update instantly and you see what each tweak buys you.
“I’ll have this” puts a dish in the basket; drinks go in with “Add a drink”. The running total sits at the bottom. “Log this as a meal” writes the lot into your day, filed by time of day as breakfast, lunch, dinner or snack.
Until you log it, the app holds on to the visit. You can close the window in the meantime and add dessert later.
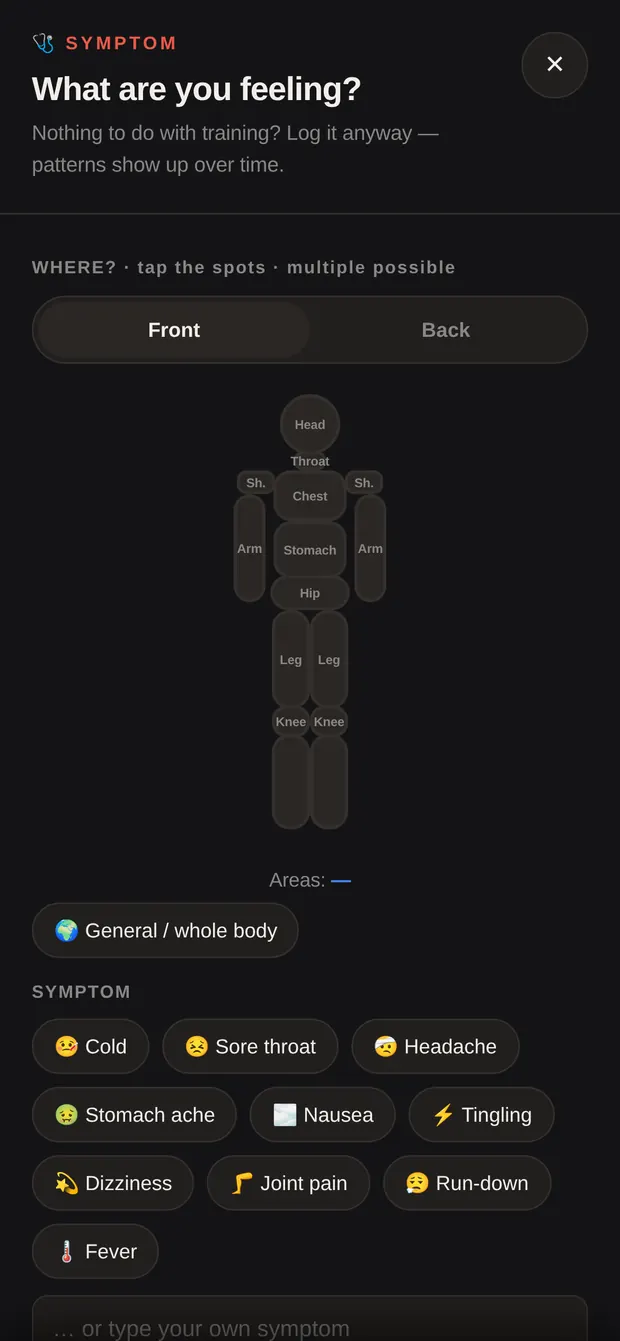
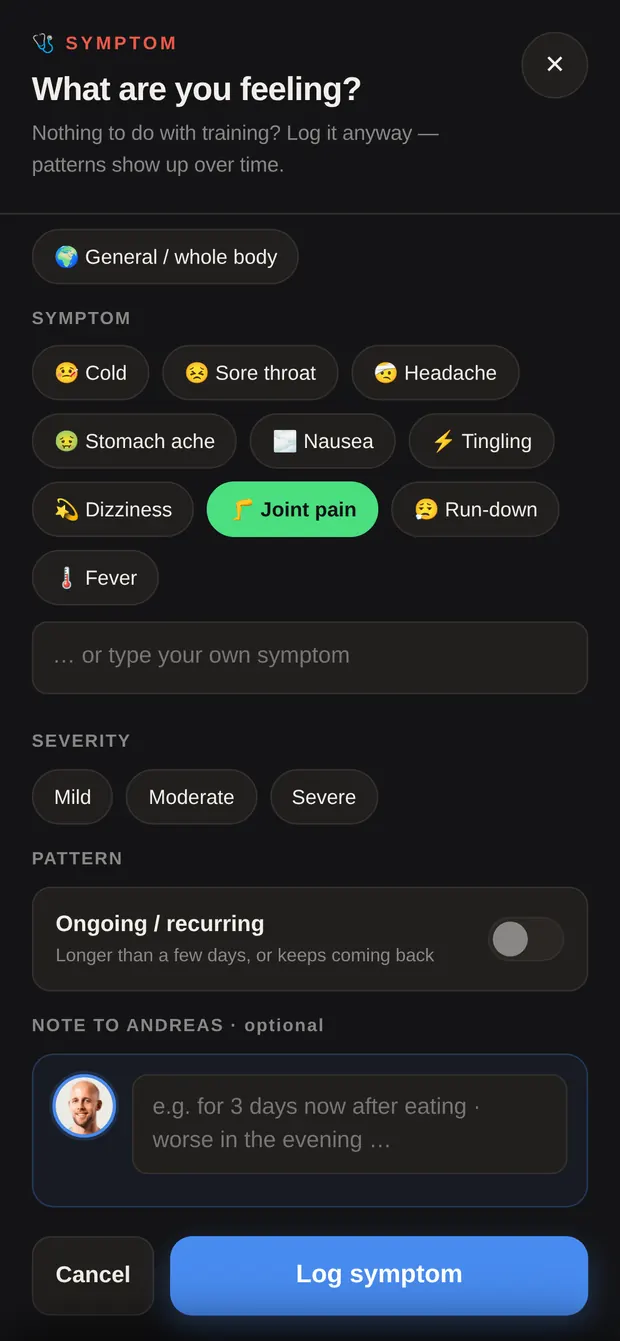
Open it with + 🩺 Symptom. A scratchy throat, a knee that niggles, a shoulder making itself known — log them, even if they’ve nothing to do with training. Over weeks it turns into a pattern.
Then “Log symptom”. You can log more than one on the same day.
That’s the + 💬 Andreas button — for anything that doesn’t fit a field. One sentence does it: “knee niggles on stairs”, “away next week”, “question about my plan”.
Under “Sent today” you can see what’s already gone out — including the lines you added to your sleep, steps or water check-ins. The small chip on the left tells you where each one came from.
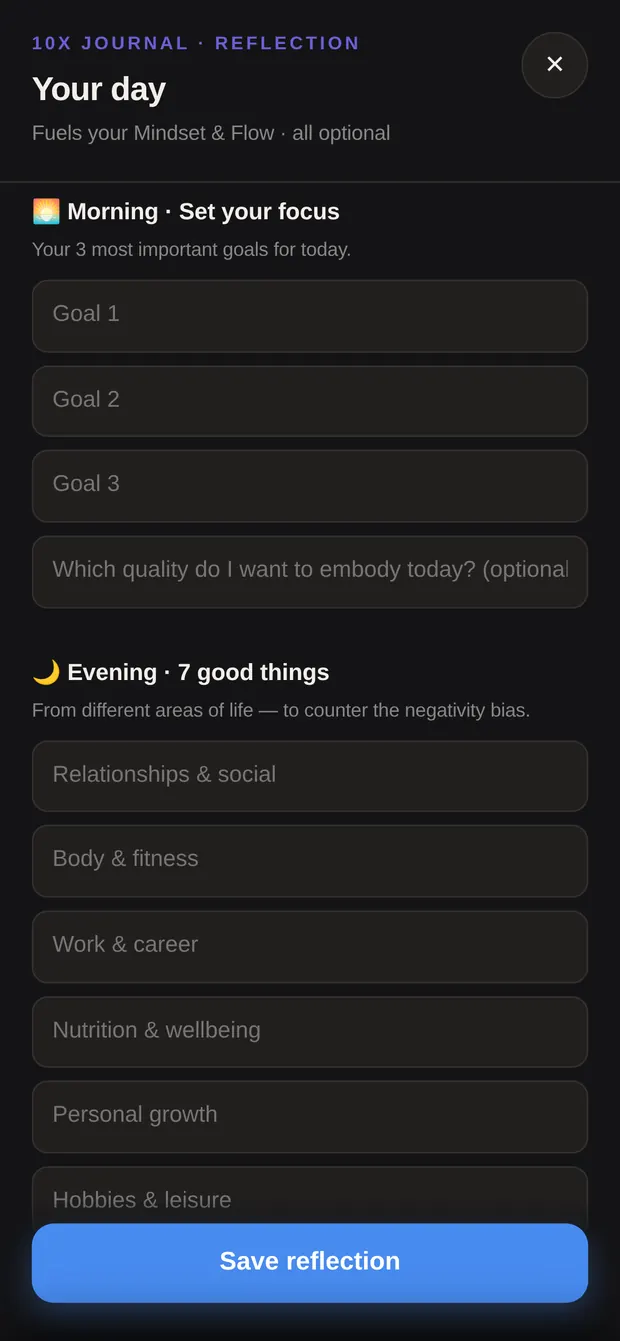
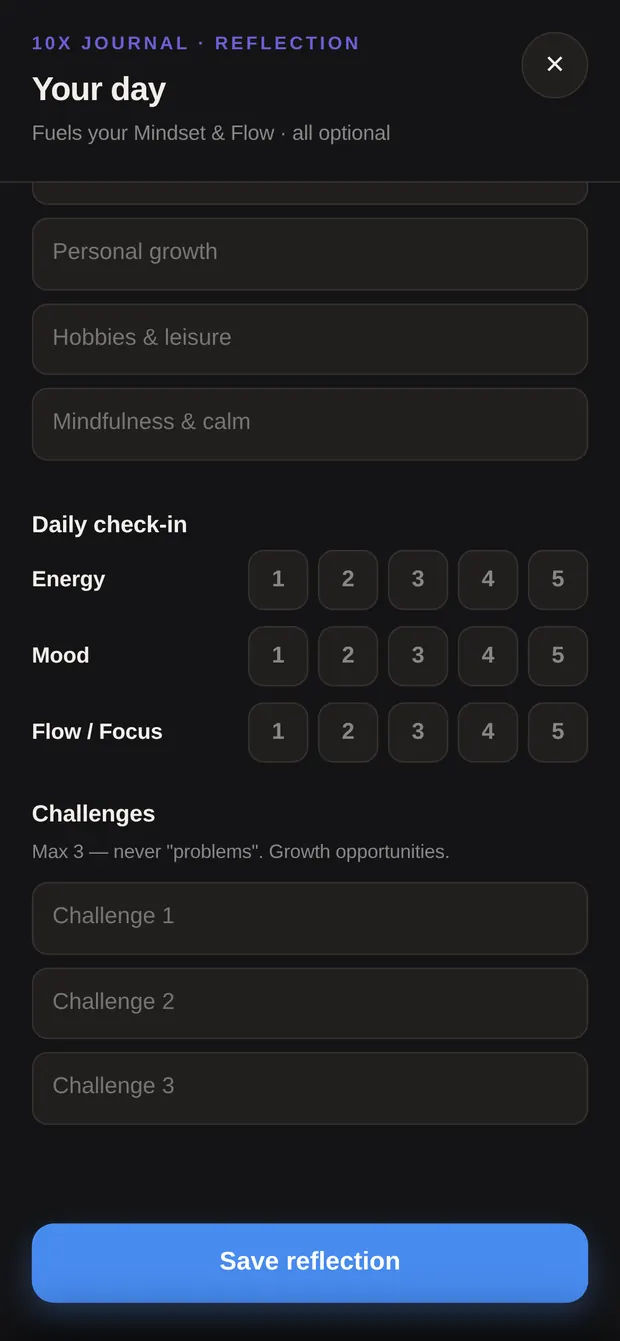
This one’s behind the purple button under the shield. All of it is optional — filling in just one block is fine.
“Save reflection” at the bottom. There’s one entry per day: write your goals in the morning, open it again in the evening, and everything is still there to add to.
Reflection feeds the Mindset pillar of your shield — the number at the top moves as soon as you save.
Three windows to read. You don’t log anything here — they show you what your entries add up to.
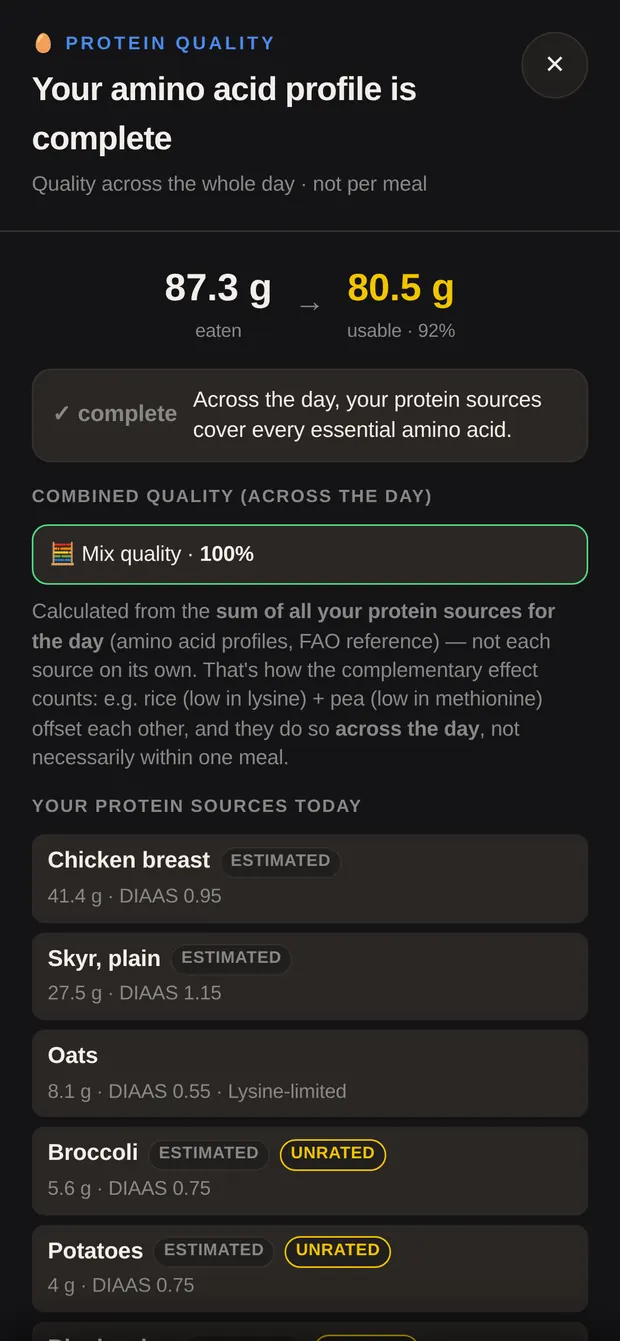
From the card under your macros. Two numbers: what you ate, and how much of it is usable — plus that as a percentage.
Here’s why: not every protein source supplies amino acids in the same ratio. Rice is short on lysine, pulses on methionine — together they cover each other’s gaps. The app works this out across the whole day, not per meal. So you don’t have to get a complete protein onto every plate.
Below that, your protein sources for the day listed one by one, and a tip on what would round the profile off today.
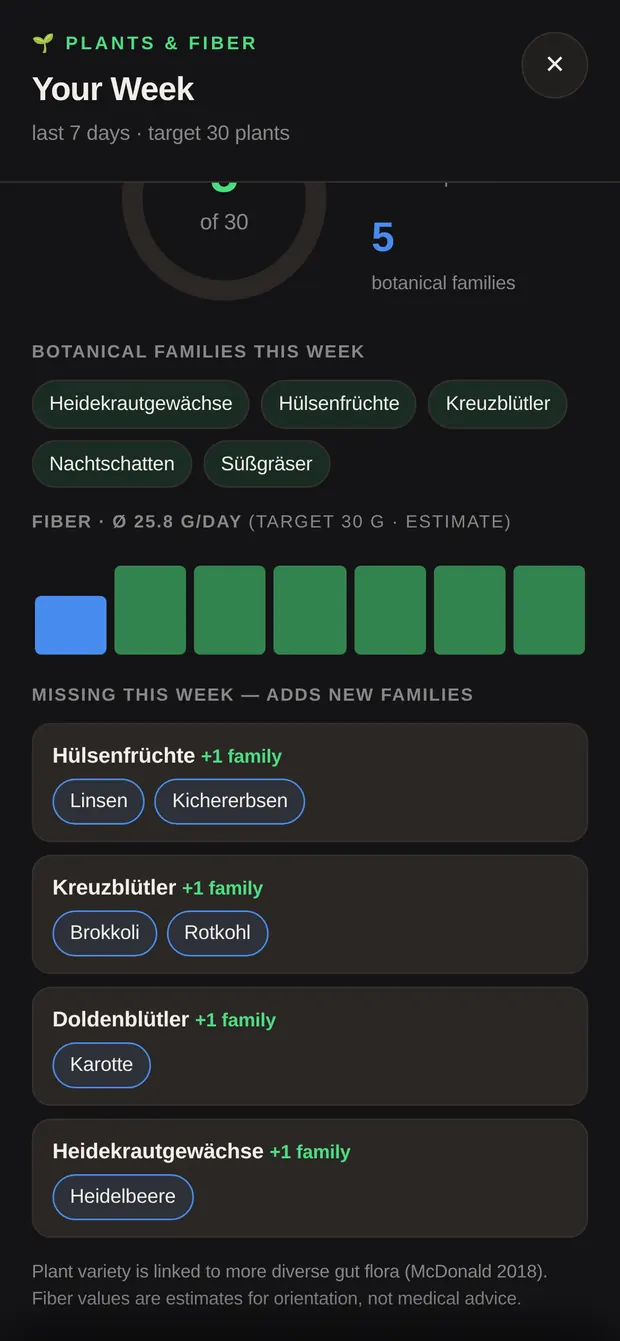
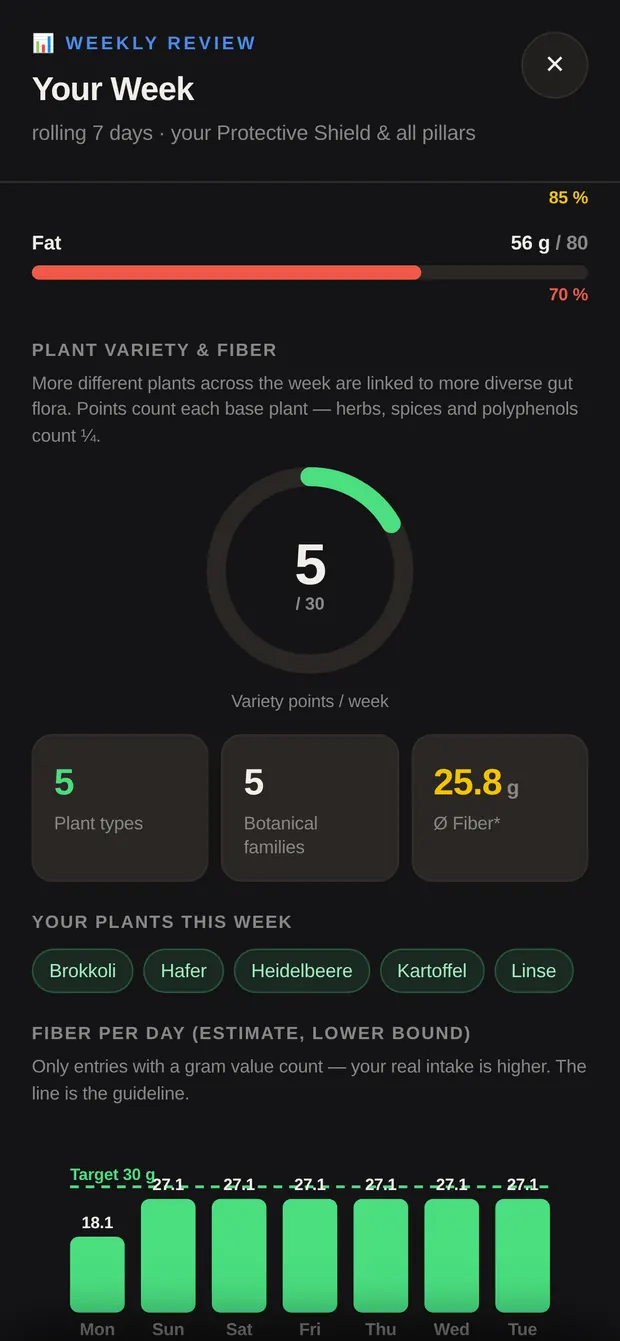
From the second button under the shield. The green ring shows your variety points over the last 7 days against your weekly goal. Next to it: how many different plants that was, and how many botanical families.
Below, your families as chips, your estimated fiber per day as bars — and under “Missing this week — adds new families”, specific foods that would each add a new family.
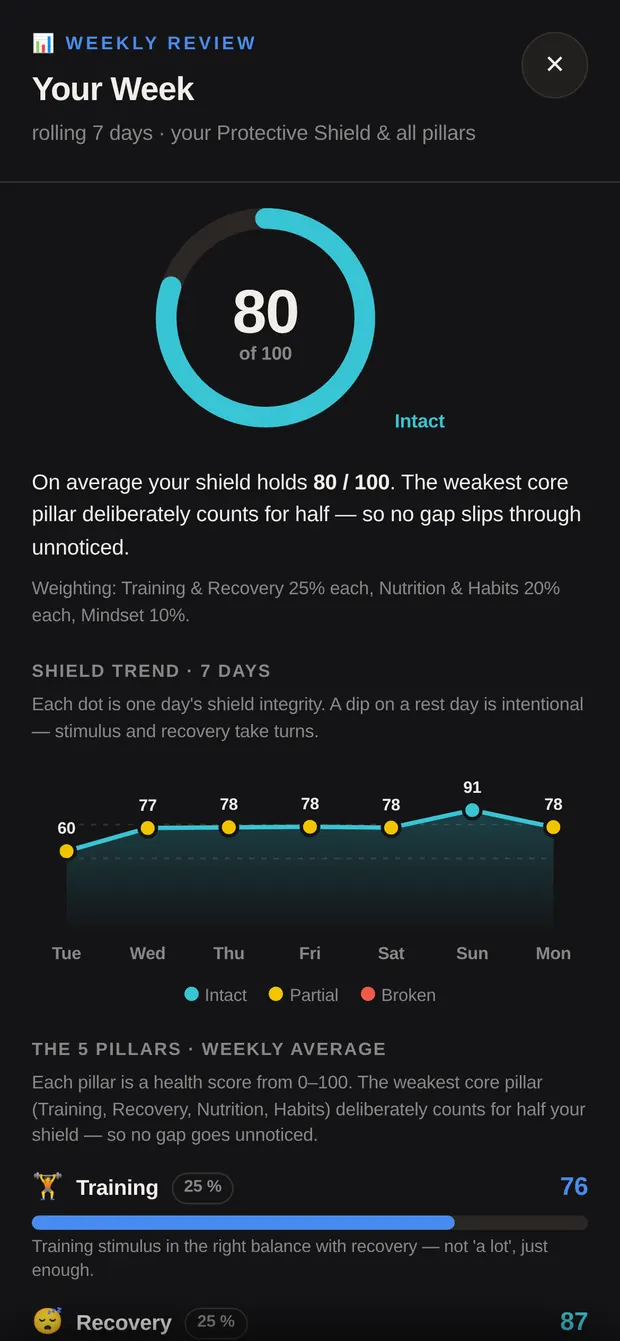
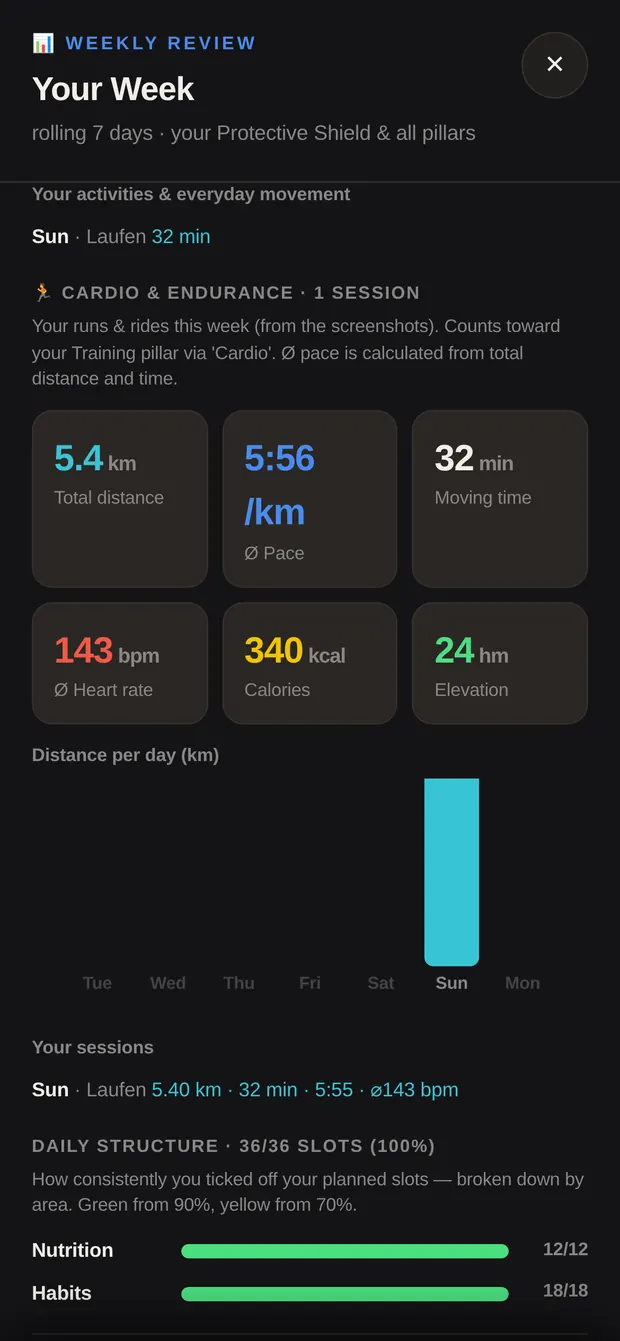
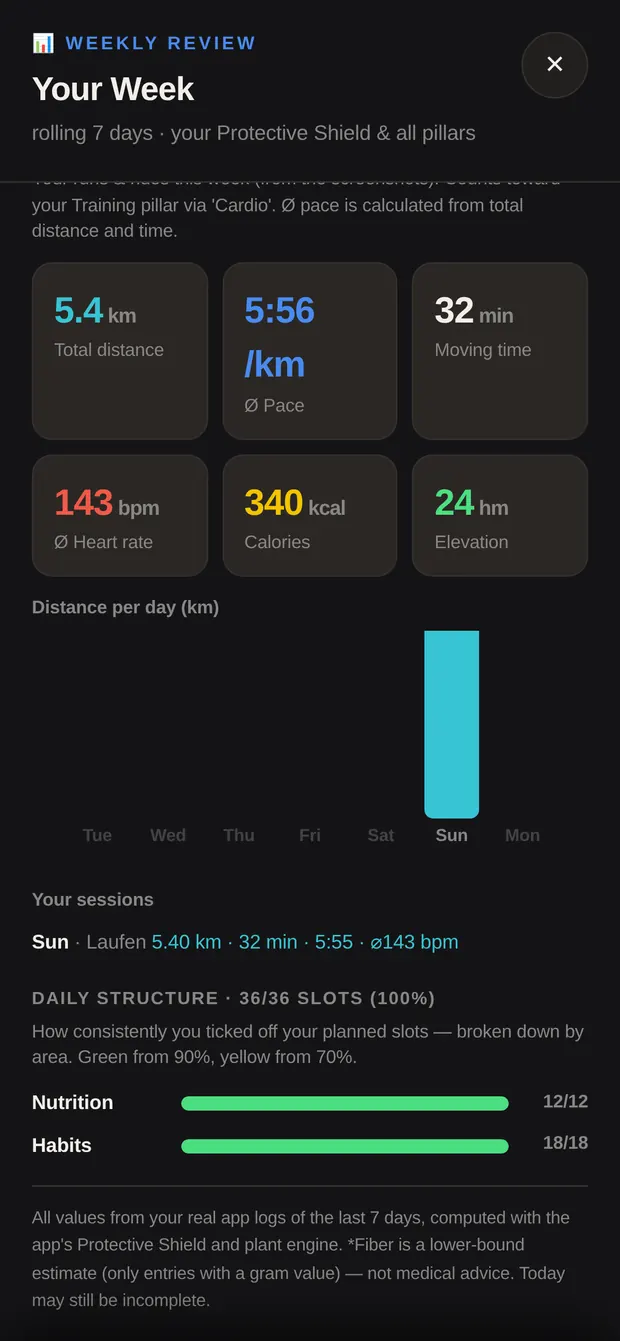
The big one: a rolling review of the last 7 days, and what we work from when we talk. In order:
Pale dots on the trend line are days with unusually few entries — they’re left out of the average so a half-logged day doesn’t skew the picture. And today is always still in progress.
The number at the top is a snapshot of how your day is running across the five pillars — and it shows you where a gap is opening up.
How hard you’ve trained, set against how well you’ve recovered.
How long and how well you slept.
Meals logged, plus your weekly supplement average.
Your small rows — water, light, mobility, wind-down. Everyday movement, steps and sun lift it further.
Your daily reflection — deliberately light.
Half of your shield value comes from the weighted average of all five pillars. The other half comes from the weakest of the four core pillars alone — training, recovery, nutrition, habits.
It’s built that way because you can’t out-train a gap. Eat and train perfectly on five hours of sleep and you won’t get a full shield — and you shouldn’t. That’s exactly the sort of thing we look at together.
Mindset deliberately sits outside the core four: a day without a reflection can’t drag your shield down. It still moves it a little — mindset carries 10% of the average, so filling one in lifts the shield by roughly two to three points.
You don’t have to work that out for yourself. As long as there’s no sleep logged for today, the line “😴 Recovery is running on a neutral value — no sleep logged yet” sits just under the shield. Tap it and the sleep window opens. Log it and the line goes.
It’s two entries and ten seconds — and it’s the difference between a shield that shows your day and one that shows a gap that isn’t there.
A low number in the morning is normal — the day hasn’t happened yet. What matters is how the week goes overall — that’s what “📊 Your week” shows you. A dip on a rest day is the point, not a problem — that’s recovery.
Anything you set to “○ Not on today” doesn’t count anywhere — neither for you nor against you. Use it on days when something was never on the plan.
The questions that come up most — and what I’d tell you.